Modelling
description
A guide on how to do it without actually editing the model, almost magic.
keywords
model, models, modelling, re-scaling, scale, scaling.
Ok, ok, I know what you're thinking..."but everyone says I can't rescale models!!". They're right. You can't. BUT what you can do is make another copy of the model, with a different scale.
This method is pretty long, and at first it'll seem overly complicated - but this method is designed so that....
a) you never have to worry about file conflicts etc, cos you end up with your own unique copy of a model to distribute.
b) you never have to go anywhere near a 3D program!
The main use for this is for getting normal models scaled down so yu can put them in the 3d Skybox, or scaling 3d Skybox stuff back up to nomal scale. All you can do with this method is change the overall scale of a model - you cannot, for example, scale only the height. This gives you control over an overall scale factor - not independent scale factors for each axis.
The basic concept is to decompile a model, change a little bit in the model's compile instructions, then recompile it as a different model name. So first off, you'll need cannonfodder's MDL decompiler. God bless cannonfodder, for he maketh great HL2 tools.
Fire up the decompiler. For this example, i'll be changing the scale of models/props_combine/combine_barricade_med02a, so I can have a combine barricade in my 3D skybox.
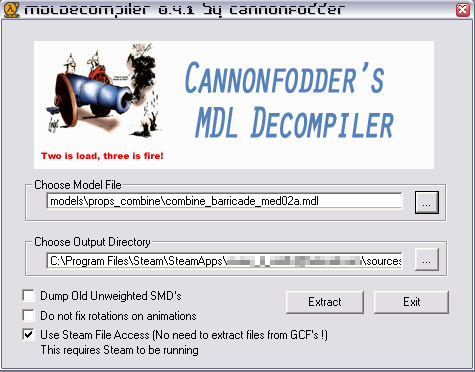
The screenshot doesn't show it, but the path i've set for the 'Output Directory' is c:\program files\Steam\SteamApps\***\sourceSDK_content\hl2\modelsrc\Jesta\.
This bit's really important: Obviously, if you're doing this for HL2MP or CS:S, then put it in the modelsrc folder for that mod. but always make a separate subfolder, with your name, or the name of your map or something recogniseable. This not only makes it easier to find, it also ensures against any file conflicts with the original model - which makes it distributable.
Now press 'Extract', let it work through, then close. Navigate to the folder you extracted to. You'll see something like this:
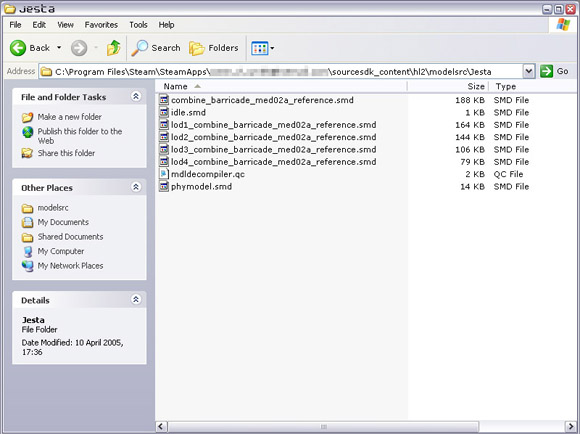
Open up the mdldecompiler.qc file in Notepad, or whatever text editor you wanna use. You'll see something like this:
- Code: Select all
$cd "C:\Program Files\Steam\SteamApps\***\sourcesdk_content\hl2\modelsrc\Jesta"
$modelname "props_combine\combine_barricade_med02a.mdl"
$model "Body" "combine_barricade_med02a_reference.smd"
$lod 30
 {
  replacemodel "combine_barricade_med02a_reference" "lod1_combine_barricade_med02a_reference"
}
$lod 40
 {
  replacemodel "combine_barricade_med02a_reference" "lod2_combine_barricade_med02a_reference"
}
$lod 100
 {
  replacemodel "combine_barricade_med02a_reference" "lod3_combine_barricade_med02a_reference"
}
$lod 110
 {
  replacemodel "combine_barricade_med02a_reference" "lod4_combine_barricade_med02a_reference"
}
$cdmaterials "models\props_combine/"
// Model uses material "combine_barricade_tall02b.vmt"
// Model uses material "com_shield001a.vmt"
// Model uses material "combine_grate01a.vmt"
// Model uses material "PHONG_combine.vmt"
$surfaceprop "combine_metal"
$illumposition 0.000 0.000 34.101
$sequence idle "idle" fps 30.00
$collisionmodel "phymodel.smd" {

   $concave
   $mass 60.0
   $inertia 1.00
   $damping 0.00
   $rotdamping 0.00
}
Right. We need to do two things to this: First of all, we need to edit the model name and model destination. So the second line:
- Code: Select all
$modelname "props_combine\combine_barricade_med02a.mdl"
Would become something like this:
- Code: Select all
$modelname "Jesta\combine_barricade_med02a_skyboxscale.mdl"
This tells the compiler to compile the model into C:\Program Files\Steam\SteamApps\***\half-life 2\hl2\models\Jesta\ and to name the compiled model combine_barricade_med02a_skyboxscale.mdl
I'm changing the directory AND the filename. Actually, you would only have to change one of these, but this way is 100% safe, makes stuff easier to find, and is generally good practice, since the steam filesystem can get quite confusing.
Some model files already have a $scale 1.0 line in them somewhere. If they do, then change that figure to whatever you want - we'll get to that in just a second.
If you can't find a $scale 1.0 line, then add it - but make sure you add it just below the $modelname line that we just modified.
Now - changing the scale. This bit should be obvious...If you want to put a normal-scale model into the skybox, change the scale figure to 0.0625. If you want to put a skybox model into normal scale, change it to 16. Or whatever you want, really....someone could try making a map with double-sized oil-drums or something, for instance.
For my purposes, i'm adding the line $scale 0.0625 to mine. So the top of my qc file now looks like this:
- Code: Select all
$cd "C:\Program Files\Steam\SteamApps\***\sourcesdk_content\hl2\modelsrc\Jesta"
$modelname "Jesta\combine_barricade_med02a_skyboxscale.mdl"
$scale 0.0625
.
.
.
.
Now save your .qc file. It's time to compile! The easiest way to do this is to make a desktop shortcut to "C:\Program Files\Steam\SteamApps\***\sourcesdk\bin\studiomdl.exe". Then drag-and-drop your mdldecompiler.qc file onto it. a command-promt winodw will pop up, and it'll start working on your model. Once it's done, it'll close.
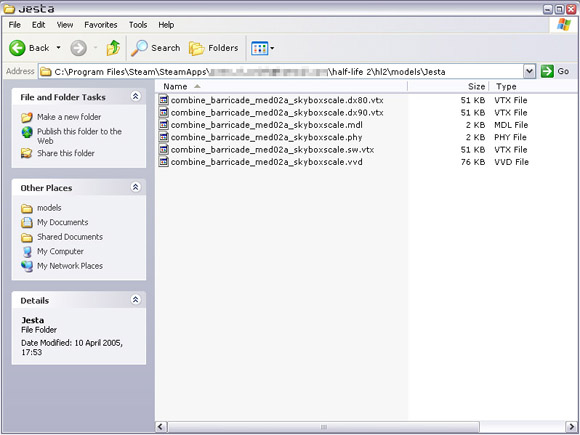
Done! If you now navigate to the folder you specified in the .qc, in my case C:\Program Files\Steam\SteamApps\***\half-life 2\hl2\models\Jesta\, you should see something a bit like this:
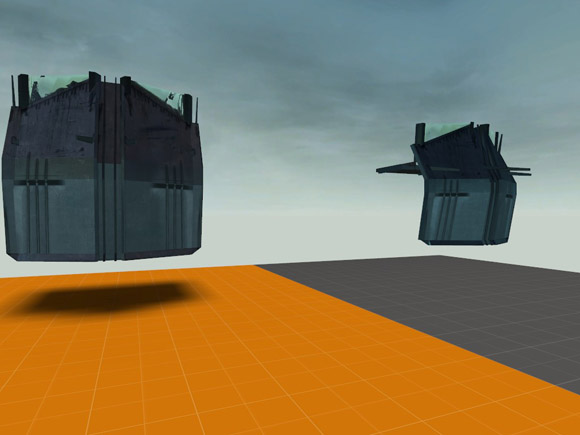
Brilliant! Now we can view the model in modelviewer, or put it into our maps. Here's a little comparison i've done between my skybox-scale model, and the original. The orange area is normal scale, the grey area is the 3d Skybox.
A few tips to keep in mind:
TIP: You may often need to add $staticprop to the qc to get things working, especially if you're using models originally intended to be physics objects. as you can guess, this forces them into static props, meaning you use the prop_static entity for them.
TIP: I find it best to set up a desktop batch file for StudioMDL, largely because i can then add the 'pause' command at the bottom, allowing me to go back and review what studioMDL did. So OI have a batch on my desktop that looks like this:
- Code: Select all
"C:\Program Files\Steam\SteamApps\***\sourcesdk\bin\studiomdl.exe" "C:\Program Files\Steam\SteamApps\***\sourcesdk_content\hl2\modelsrc\Jesta\mdldecompiler.qc"

pause
TIP: Sometimes the models come out facing the wrong way round...I think that's to do with the decompiler. Not a major problem, just be aware of it.
TIP: You'll need to distribute your new model with your map - best way is to use BSPZIP. Read the SDK documentation, but remember to zip in ALL the model files (shown in the 3rd screenshot - they're all important!
--Jest@--


