Modelling
description
Realistic Valve-like cinematic physics
keywords
physics, cinematic, realistic.
What are Cinematic Physics?
Cinematic physics is a concept valve put into use in The Orange Box. By fragmenting an object, then using a force to push those fragments away, then baking that into a model, you can achieve what looks to be realtime destruction that's easy on the system and looks totally epic!
Sounds fun, what do I need for this?
• 3ds Max (Any newer version will work, i'm using 9, which is the lowest supported.)
• RayFire (Get a free almost fully functional trial at http://www.mirvadim.com
• VTF Importer and SMD Exporter.
• 10-20 minutes of your time
Okay, let's get started.
First of all, install Rayfire and open up 3ds. Go to the top right and change "Standard Primitives" to "RayFire Tool". Then click the "RayFire" button. A button called "Open RayFire tool floater" will appear. Click it. The RayFire tool will open.

Minimize the tool. To start, we need an object to explode. You could import a model from HL2 or TF2 and explode it, but for this tutorial, we'll make our own stuff. Go back to the top right and change back to "Standard Primitives" Create a box 256 wide by 256 long, and make it 4 units thick. You can do this from the "Keyboard Entry" tab. If you have a texture, apply it now. You should have something like the object below:

Now, reopen your RayFire tool. Click the simulation button, make sure your new block is selected, and click "Add" under "Impact Objects". Impact objects are objects that get fragmented and exploded.

Minimize the RayFire popup. Now, create a GeoSphere (Still under "Standard Primitives") however big you want your explosion to be. This will be your bomb. In my case, i want it right under the platform.

Open back up the tool. Go to the RayXplosion button. This is where the magic happens. Scroll down in the list until you see Reactor Explosion and "Bombs". Make sure your GeoSphere is selected and click "Add" to add your sphere to the list of bombs. You can have more than one bomb, but for something like a TF2 Payload explosion or anything else, one should be okay.

Scroll back up to the top of the list. You'll see "Fragmentation options". This is how your slab/object breaks.
Fragmentation type - This is how the object breaks. You can have uniform - all pieces are the same. Irregular - some big pieces and small pieces. Or, Relative to Bomb/Impact - pieces fragment more where the bomb is. We'll use that. Other options are more advanced.
Iterations: X/X - First number is how many pieces you want the thing broken into. This isn't exact, usually it's a little more than what you put in. Mind that you must stay under 127 fragments as this is source's limit. But you can break it up into chunks of models like valve does and have an unlimited number, but that's a little complicated. Let's stick to 40. Second number is how random the fragments are. Let's keep that at 5. That's all you need to set here.
Now click "Fragment impact objects". This will break up your object. Usually you can't notice the fractures in the game unless you look really really hard.

Now, scroll back down again to "Bombs". This is where you can mess around with the settings for your bomb. The two things you want to mess with are "Time Range" and "Explosion strength". The demo has a 100 frame limit, i think. You could leave explosion strength at default for this tutorial, but with bigger objects you need a little more force. Big numbers are not needed, the citadel only takes a bomb of 50 to forcibly explode. 15 will be good for the slab.

Now go click the "Physics" button. Here you can mess with material types, etc. Go down to "Unyielding objects". These are objects that the debris from the fragmented object will collide with. You could import a section of your map where the exploded object is and use this to collide with the debris, but i'm not going to go into detail with that (In short, export your map in Hammer as a dxf, import in 3ds using "Layers, Blocks as node hierarchy", and make this your impact objects.). We'll just make blocks as the ground around the slab.

Now, select these blocks and anything else you don't want to move during the explosion (Even pieces of the fragmented slab if you want to) and click "Add" under unyielding objects.

Good, nearly done. Go back to the RayXplosion tab, scroll down to bombs, and click "Explode impact objects". It will warn you there's no going back. Click OK. Yay, big boom! It'll warn you about interpenetrating stuff, don't worry about this, you can click OK.
If all is well, you should have something like this:
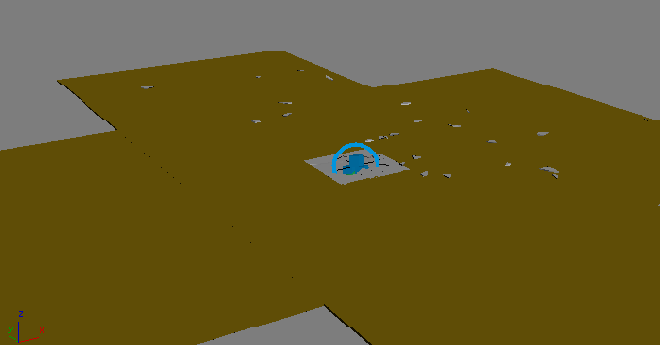
Now, delete everything you used for colliding with the debris, like your map you imported or whatever, and also your geosphere. You should be left with just the debris and the little blue marker it created. You're done! Move the animation timeline at the bottom back to 0.
Now, go to File > Export. Export as SMD (If you don't have SMD import/export i suggest you go get them at http://www.wunderboy.org/) First export as a reference (We'll call that "slab_ref.smd"), then export as a Sequence SMD from frames 9-100 (Or replace 100 with however many frames you set the animation to be). We'll call this "boom.smd"
The exporter seems to bone every piece for you. If you get an error about too many bones, you need to break your model into chunks.
Viola. Here's my qc file for the model:
- Code: Select all
$cd "C:\slab"
$modelname "PhysXDemolition\slab.mdl"
$model "Body" "slab_ref.smd"
$cdmaterials "models\props_physxdem\"

$sequence idle "slab_ref" loop fps 30.00
$sequence boom "boom" fps 30.00
- Jimmy422


