Texture Creation
description
How to create water textures, including a scrolling effect.
keywords
water, texture, running, textures, liquid.
First let me being with a little background. I have thing for water and waterfalls that started before source. In HL1 you could not mix water and a push, but I found a trick to make it work so when you fell in it would carry over the falls. When source came out you could then have a push and water together occupying the same space. Hense the map de_congo. But the water texture was simple, more like HL1, plus I went about it the wrong way. I have since created several water textures and in the tut hope to explain how to make many type and how to apply their uses. I will be starting simple with a texture that mearly scrolls that appears like water and move on to step by step on how to create HL2 like water, including reflection, transparenties, and so on. Below are a list of tools that I use. Some of these are freeware, some are limited demos, some are good for 30 days.
http://www.alienskin.com/downloads/getmail1.asp
http://3d.kerlinsoftworks.com/ (kerlin assures me his site will be back up and running soon)
Corel Resource - Click
http://www.adobe.com/products/photoshop/main.html
http://developer.nvidia.com/object/nv_t ... tools.html
http://nemesis.thewavelength.net/index.php?p=19
Helpful info
http://www.valve-erc.com/srcsdk/Materials/water.html
Since this is a more advance tut I will not be covering how to setup and use vtex or any programs that do that same thing. I will not be covering how to make alpha maps (site with tut posted below for alphas) as there are serveral tuts on the web covering this. You will need to understand how to setup and use the material folders, edit .vmt files, and how to name your files. If I think about I will add some info to help out the less advanced mappers.
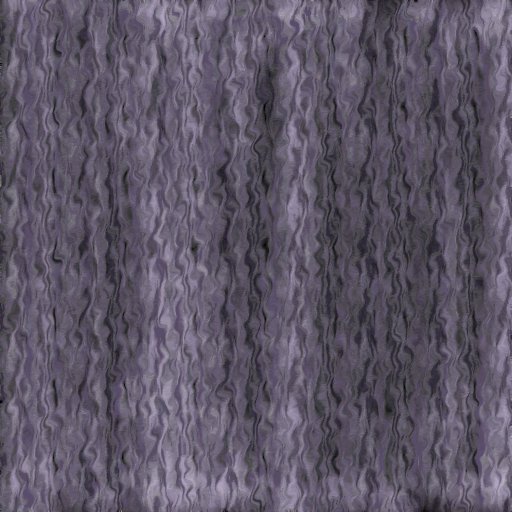
sample texture for you to use-

Chapter 1 Fake water for leaks and thin falls.
Ok, let begin. The first tool that you will need is any paint app that supports .tga. I recommend autoseemer also. We are going to make a scrolling texture that looks like water. You are encouraged to come with your own water or water like texture as there are images and tools with in Paint Shop Pro (PSP) and Photoshop (PS). I will cover a couple of techniques to get you started. PS and PSP have ways of making seemless textures, but you have select an area inside of the texture and have to resize it. They look good and seem well, but they lose some the edge by serval pixels. You could start with a larger I guess, but I always start with a new 512x512 image. In PSP, in the controls you can select a brush texture. Select ocean, click over to the brush tips. Set the opacity to 4. Set the brush size to something over 50 or over. Now paint the area back and forth, trying not go over back over area already painted. I recommend a dark blue background and light blue for the surface. Now copy and open autoseemer. Paste into autoseemer, blend the edge to your liking and copy again. Paste back into PSP and save a .tga. Use vtex to convert the image to a HL2 texture.
For PS, there are many ways to do create a semi realistic water. One method I found is start with a new image, add noise to it and then run the liquify brush over it. Now the bummer for PS I found is that I can't just copy and paste into autoseemer(have not taken the time to find out how or why). Save as .bmp, open in autoseemer and blend. Save and open back into PS and save as a .tga. Vtex it.
There also some plugin you can use to create this effect. Also you can google up some images of waterfalls and clip out section the pretty much matches up on all sides and autoseem it. You don't want to have mist in one part and clear water in the other for example.
Now you have a couple of ways of making water. Now we need to edit the .vmt file. Open your newly created .vmt file and add this code for the texture. Just copy and paste what I have here. I have added comments where I can to help you understand what is going on.
----------------------
- Code: Select all
"LightmappedGeneric"
{
   "$baseTexture" "water/mywater" //edit this to match your texture file name and location

   "Proxies"
   {

      "TextureScroll"
      {
         "texturescrollvar"                                   "$basetexturetransform" //tells the proxy what texture to move.
         "texturescrollrate" .5 // This is how fast to scroll the texture.
         "texturescrollangle" 270 //this is the angle at which it will scroll.
      }


   }

}
----------------------
All done, you have simple scrolling water. This works good for simple waterfalls on a thin plane like small leaky surfaces and the file size is small. You may need to adjust the scroll angle to match the way you have it lined up within your map.
Add transparency
Now with the same texture make an aphla channel, save the texture, and vtex. Use this tut for aphla channel textures - http://www.hl2world.com/wiki/index.php/ ... l_Textures This tut is for PS, but I worked it out for PSP, doing much the same thing like splitting the RBG channel.
----------------------
- Code: Select all
"LightmappedGeneric"
{
   "$baseTexture" "water/mywater"
   "$translucent" "1" //this tells the image to be transparent.


   "Proxies"
   {

      "TextureScroll"
      {
         "texturescrollvar"
         "$basetexturetransform"
         "texturescrollrate" .5
         "texturescrollangle" 270
      }


   }

}
----------------------
This texture will works well covering a func_illusionary as bullets will not show up and no funny looking splashes. If you place over a BSP brush the bullet hole will stay put and not scroll. You now have a transparent scrolling water texture. Also this works well for waterfalls on a thin plane. Since you can not use HL2 water on anything other than the Z plane, at least if you don't want it to reflect. I have not tested but this should work just fine using the "$envmap" "cubemap" line to have reflections. If you want contevt the texture to a 256 gray scale image and use as envmapmask. You will need to setup a scroll on the mask also.
Chapter 2 Close to Source water.
Ok now moving on to make the water texture act like water, stuff you can jump in and swim around in. Lucky for us we can still use the same base texture, we just need to edit our .vmt file. The .vmt will now start getting more complex. We are going to make a water that is more like HL1 water. I added some comment lines to help explain what is going on. For this water you will need two .vmt files, one for top and one for the below. I recommend you remove the comments lines in your .vmt file.
----------------------
- Code: Select all
"LightmappedGeneric"
{
   "$abovewater" 1   //This is what tell the water to be on top.
   "$baseTexture" "water/mywater"
   "$scale" "[.5 .5]"
   "$translucent" "1"

   "%compilewater" 1 // to compile as water
   "$surfaceprop" "water" //for physics

   "$fogenable" 1 // set to 0 for no fog
   "$fogcolor" "[.1 .1 0]" // RGB setting for color of the fog. 0 is white 1 is black.
   "$fogstart" 0 // keep this a 0 or the fog will not look right
   "$fogend" 150 //larger the # the farther the fog will start from the player.

   "$texoffset" "[0 0]" //These two lines help the water scroll.
   "$texscale" "1"

   "$bottommaterial" "water/mywater_under" //see below for waterunder.vmt


   "Proxies"
   {


      "TextureScroll"
      {
         "texturescrollvar" "$texoffset"
         "texturescrollrate" .5
         "texturescrollangle" 90.00
      }

      "TextureTransform" //helps the water scroll
      {
         "translateVar" "$texoffset"
         "scaleVar" "$texscale"
         "resultVar" "$basetexturetransform"
      }
   }
}
----------------------
This is for the underneath water, this is needed when you are underwater or you will get the checker board pattern. Not much here changes. Make sure to have your fog, scroll rate, and angle matching to look like the top of your water.
----------------------
- Code: Select all
"LightmappedGeneric"
{
        "$abovewater" 0   // this tells the compile this is the water from below.
   "$basetexture" "water/mywater" // you can use the same texture, the vft file.
   "$scale" "[.5 .5]"
   "$translucent" "1"

   "%compilewater" 1
   "$surfaceprop" "water"

    "$fogenable" 1
   "$fogcolor" "[.1 .1 0]"
   "$fogstart" 0
   "$fogend" 150


   "$texoffset" "[0 0]"
   "$texscale" "1"


   "Proxies"
   {

      "TextureScroll"
      {
         "texturescrollvar" "$texoffset"
         "texturescrollrate" .5
         "texturescrollangle" 90.00
      }

      "TextureTransform"
      {
         "translateVar" "$texoffset"
         "scaleVar" "$texscale"
         "resultVar" "$basetexturetransform"
      }
   }
}
----------------------
This water works well for deeper water and you can add push brush in the water to move the player over falls and down streams. Works well on all angles, unlike source water. If you like to can make good lava or slime also, simply adjust the texture to look like what you want and put a trigger_hurt under it.
Chapter 3 Source water.
Ready to move on to HL2 water? Ok, let's go. Now we be will delving into normal and DUDV maps. This where you will need PS and the nvidia plugin. This is the easiest way I have found to make these maps. BUT, vtex does have a some commands to convert textures to normals and DUDV maps, use the source SDK docs for information or google up some other app if you want, I will be only be using nvidia plugin and PS here.
Cool thing, we can still use the same water texture you created before. Open the texture in PS, use the nvidia plugin, the default setting should work fine. I suggest not using the alpha or height settings. Save as normal map as (use your file name) mywater_normal.tga and save as 32 bit. Now from the normal map, generate a DUDV with the same plugin. Save as mywater_DUDV. Run vtex on both, you don't need to do anything special for this as vtex will see the _normal and _DUDV and automatically knows what to do to compile them. YOu can trash the mywater_normal and mywater_DUDV .vmt files, they aren't good for much except wasting space and cluttering up your texture browser. You will need to create a new .vmt for the HL2 water, for this example I called it mywaterreal.vmt.
You should end up with 4 files.
mywaterreal.vmt - this will be the HL2 water.
mywater_under.vmt - bottom material for viewing from beneath
mywater_normal.vft -for bump mapping.
mywater_DUDV.vft - for dx8 fallback/refractor.
----------------------
- Code: Select all
"Water" // this is a water shader
{

   "%tooltexture" "water/mywater_normal" //shows up in your texture browser
   "$refracttexture" "_rt_WaterRefraction" //set water refraction - not the same as water reflection. sets the blurriness in the water.


   "$abovewater" 1

   "Water_DX90" //these are fallbacks to help the player match the DX level on their video card.
   {
      "$refractamount" ".2"
   }
   "Water_DX81"
   {
      "$refractamount" ".1"
   }
   "Water_DX80"
   {
      "$refractamount" ".1"
   }
   "Water_DX60"
   {
      "$fallbackmaterial" "water/mywater" // this is good to set from the last water texture you created because it will not reflect.
   }

   "$scale" "[.5 .5]"

   "$bumpmap" "water/mywater_dudv"
   "$normalmap" "water/mywater_normal"
   "$envmap" "env_cubemap" //this is for the cubemaps to work so they grab and reflect back your map. you can also specify a texture if you wish like this "$envmap" "mytexture"

   "%compilewater" 1
   "$surfaceprop" "water"
   "$bottommaterial" "water/mywater_under"

   "$fogenable" 1
   "$fogcolor" "[.1 .1 0]"
   "$fogstart" 0
   "$fogend" 150

   "Proxies"
   {


      "TextureScroll"
      {
         "texturescrollvar" "$bumptransform"
         "texturescrollrate" .50
         "texturescrollangle" 90.00
      }

      "WaterLOD" //I think it lets lod controller entity adjust cheap/expensive distance, don't think it's requied, works without it.

   }
}
----------------------
This is a water shader and has propertiers to reflect, refract and act like water. save the .vmt different from mywater.vmt because you can use the last water as a fallback material for the DX shaders.
Now this works, but the only problem is that this looks like a clear conveyor belt, there is no life to it. So, I will show you how to animate it. Back to PS or PSP with orginal testure, with no alpha channel. Make 4 or 5 copies, remember the more you have the more work it will be, but the smoother the animation. I am using eye candy 3.0's jiggle plugin, but there are other plugins or things you can do cause each frame to be a little off from the next texture. Add an alpha channel to each one.
Once you have this completed, save the textures as mywater000.tga, mywater001.tga, and so on. Now to get the animate to repeat back on itself, resave the the textures between the first and last in reverse order. For example if you used 4 copies resave 3 as 4 and 2 as 5(your first texture 000 not 001). You should have 6 files when starting with 4 copies. Now normal map each one and save as mywater_normal000.tga, mywater_normal001.tga, you get the point. From the normal maps, use the DUDV on the normal maps. Once more save as mywater_DUDV000.tga, mywater_DUDV001.tga,...
OK, so we have a boat load of textures, now what? You need to setup 3 txt files for vtex to use. Name them as mywaterreal.txt, mywater_normal.txt, and mywater_DUDV.text.
Copy and paste this into each txt file. Set the end frame for the number last frame you have in your set.
"startframe" "000"
"endframe" "005"
Process each set through vtex like you would normally but add the .txt extention instead of .tga. Here is an example from my command line from the last one I did, \cstrike_sample_content\materialsrc\water3\stream.txt.
Almost done. Just need to edit the .vmt to include animatation.
--------------------
- Code: Select all
"Water"
{

   "%tooltexture" "water/mywater_normal"
   "$refracttexture" "_rt_WaterRefraction"


   "$abovewater" 1

   "Water_DX90"
   {
      "$refractamount" ".2"
   }
   "Water_DX81"
   {
      "$refractamount" ".1"
   }
   "Water_DX80"
   {
      "$refractamount" ".1"
   }
   "Water_DX60"
   {
      "$fallbackmaterial" "water/mywater" //this is the first set of animations.
   }

   "$scale" "[.5 .5]"

   "$bumpmap" "water/stream_dudv" // this was the 3rd set.
   "$normalmap" "water/stream_normal" //2nd set.
   "$envmap" "env_cubemap"

   "%compilewater" 1
   "$surfaceprop" "water"
   "$bottommaterial" "water/mywater_under" //adjust your mywater.vmt for animation. see the next .vmt below.
   "$bumpframe" "0" //tells the animation where to start

   "$fogenable" 1
   "$fogcolor" "[.1 .1 0]"
   "$fogstart" 0
   "$fogend" 150

   "Proxies"
   {
      "AnimatedTexture"
      {
         "animatedtexturevar" "$normalmap"
         "animatedtextureframenumvar" "$bumpframe"
         "animatedtextureframerate" 5.00  //see notes below.
      }

      "TextureScroll"
      {
         "texturescrollvar"
                        "$bumptransform"
         "texturescrollrate" .50
         "texturescrollangle" 90.00
      }

      "WaterLOD"


   }
}
---------------------------
// notes for"animatedtextureframerate" - you can adjust this for faster or slower frame rates. It has nothing to do with the number of frames but how fast the frames are shown, clear as mud? This shows frames per second, so if you have 6 frame at a setting of 1 in 6 seconds you will see 6 frames, 2 shows 2 frames per second, a 6 is 6 frames per second. 12 will show the frames twice in one seconds. You will more than likely need to test in game to see what works for you.
This is for the water beneath.
---------------------------
- Code: Select all
"LightmappedGeneric"
{
        "$abovewater" 0
   "$basetexture" "water/mywater"
   "$scale" "[.5 .5]"
   "$translucent" "1"

   "%compilewater" 1
   "$surfaceprop" "water"
   "$bumpframe" "0"


    "$fogenable" 1
   "$fogstart" 0
   "$fogcolor" "[.1 .1 0]"
   "$fogend" 150.00

   "$texoffset" "[0 0]"
   "$texscale" "1"


   "Proxies"
   {
      "AnimatedTexture"
      {
         "animatedtexturevar" "$basetexture"
         "animatedtextureframenumvar" "$frame"
         "animatedtextureframerate" 5.00
      }

      "TextureScroll"
      {
         "texturescrollvar" "$texoffset"
         "texturescrollrate" .50
         "texturescrollangle" 90.00
      }

      "TextureTransform"
      {
         "translateVar" "$texoffset"
         "scaleVar" "$texscale"
         "resultVar" "$basetexturetransform"
      }
   }
}
-------------------------
This is basically the same as before for an underwater texture, but just added the animation proxy.
Chapter 4 Basic usage of Ripple Rain.
There are just too many effects you can do this to list, you can do pond ripples, falls ripples, bubbling lava, shields effect etc. Download here http://3d.kerlinsoftworks.com/ or here http://www.slackiller.com/slayera/ (it may not be up at the time of this posting, but keep checking it will be on one of these sites).
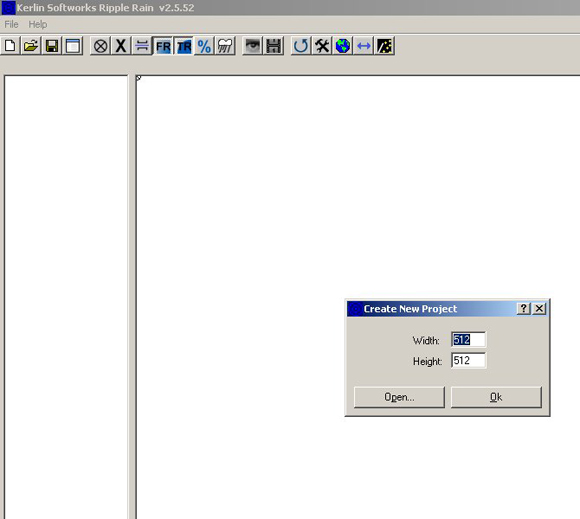
Start ripple rain. Goto File and New project. You will prompted for the image size. For half-life source textures you will need a setting divisible by 2, such as 128, 256, 512, etc. If you want click on the FR(fade radius) and TR(termination radius) to get a preview of ripple size. Now you are ready to place the emitters, or the location of where the rain drop will fall and cause a ripple. Click the circle with the X in middle to turn the tool on. Click in your work space where you want the ripple to start.
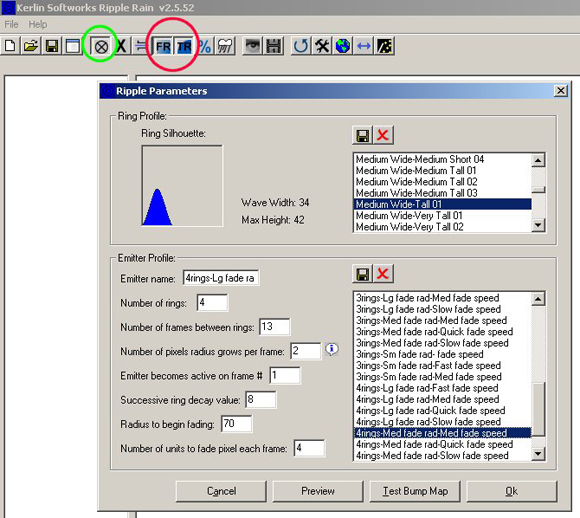
You will prompted with ripple parameters. I find for source the taller and wider the wave profile the better it will show up in the nvidia filter for normal and DUDV maps. The more rings you use the longer the ripple will last and longer the animation, the larger the file. Place a few more random emitters around.
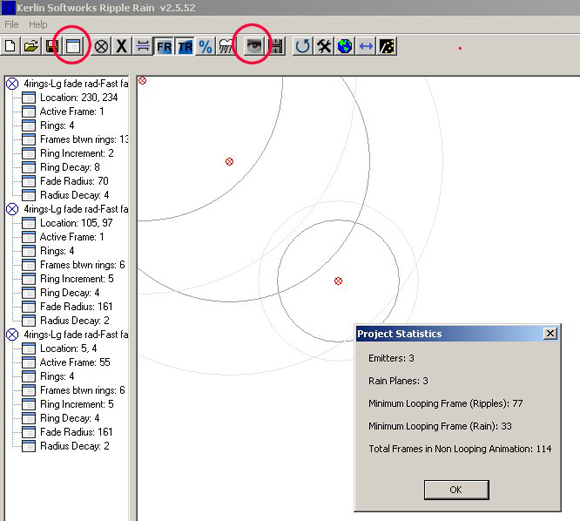
On the right is the emitter properties. Double click to open and close. If you made a mistake on placement or another setting here is the chance to correct it. Adjust any emitter properties you want.
We don't want all the emitters going off at the same time, so you need to set the Active Frame. By default the setting is 1. Meaning on frame one all the emitters will start. Open your Project Stats, that's the window looking button on the tool bar, 4th from the right. See what your minimum frame is and don't run an active frames beyond this number. When you think you have everything correct, click the eye looking button, this is the preview. Watch your emitters grow and fade, they should all start and stop at different times.
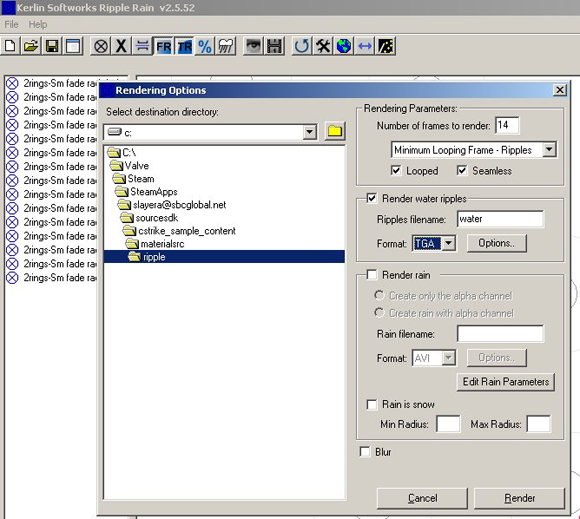
If you like what you have then you need to render it. The film clip button next to the preview,is called the Render button, click it to open. Set the Number of Frames to Render to the minimum number of frames to your Projects Stats window. In the drop down box set to Minimum Looping Frame. Check seamless and looping. Make sure Render Ripple is check and Render Rain is off. Name your file, if you plan on doing source water, you might save some time by outputing the Project as for example as rain, rain_normal, and rain_DUDV. You will need to rerun the Render one time for each. If you vtex to convert the textures then save as a .tga format. Follow the steps in Chapter 3, you will not need to copy and reverse since you all ready have a full animation set. You will need to set up text file for each of the texture packs, rain, rain_normal, and rain_DUDV to convert with vtex.
If you want to make a falls texture, where the falls hit the water, make all the emitters on one of the work space sides. You may want to uncheck the Render looping setting to make the water work fade s in the to bank and not loop back under the falls. You may need to do some readjusting to get it to look right. You will probably want to have large ripples depending the amount of area that the water falls in.
Save your project so you can reopen later it if needed. This is just a basic guide to get started, for detailed help, use the help section included with Ripple Rain.
If you want moving water and ripple rain you will need to combine the two textures though out the animation.
Click here to see an example map using Ripple Rain http://csm2.net/view_map.php?map_id=1837[/i]
Slayera


