General Half-Life 2/Editor
description
An in-depth look at what leaks are and how to solve them.
keywords
leaks, advanced, advanced leaks, guide, void, leak.
This tutorial will go over all aspects of leaks. What they are, why they exist, how to fix them, how to prevent them and even more. So, lets get started
What is a leak?
A leak is a connection from the inside of a level to the outside. Consider your level as an aquarium: Our play-area must contain water, or else we wont be able to swim (play) around in it. If there’s a leak, all the water will flow out and the player wont be able to live inside our level.
The inside (above) and outside (below) of our test-environment
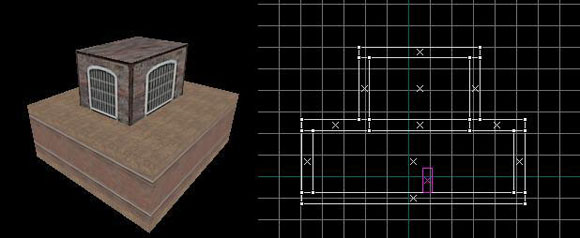
In the picture above you can clearly distinguish the inside of the level from the outside. The outside of the playarea (a.k.a. the “void” ) is the outside of the level the player will never get to.
oh gawd, it’s a leak!
Why leaks?
Because our level has an inside as wel as an outside, we have a way to make our level draw faster: since the player will never see the outside of the level, why render it? If we can find out which brush-sides make up the outside of the level, we could delete them and make our level faster! Plus, we wouldn’t have to worry about lighting or collision detection of the outside of our level. This doesn’t only save on rendering speeds, but also on memory-usage.
There’s only one problem: How can we make a program find out what the inside of the map is?
Valve used this method: Take an entity, and try to connect it with a brush-side without crossing world-brushes. (brushes that aren’t tied to entities or are displaced). Since all entities are ALWAYS IN the level, these brush-sides are also INSIDE the level. We wouldn’t be able to connect an entity with the outside part of a level, unless there is a leak…
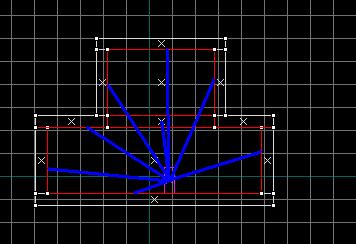
All the red brush-sides are connectable to the entity in our level (a player_start in this case) and thus are considered INSIDE of the level. We don’t even have to consider the while brush-sides anymore, we know FOR SURE they are OUTSIDE the level and thus can be deleted safely.
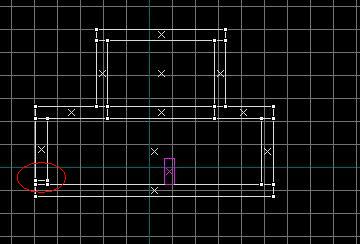
Lets consider the same level WITH a leak

Theres one leak in the lower left corner and see what happens! A lot more faces are considered INSIDE the level, as the compile tools can connect these faces to one of our entities and suddenly our level has over twice as much brush-sides!
The program that does all this is (v)bsp, and it is essential if we want to make our level playable. What it does (in pseudo-code) is simply:
- Code: Select all
For each brush-side in the map
   Try to connect this brush-side with any of the entities in the map

   If (able) current brush-side is INSIDE_LEVEL
   Else current brush-side is DELETEABLE
Consider next brush-side
But now the program still doesn’t know whether the level its calculating has a leak or not. It doesn't have to try to delete the outside brush-sides if there's a leak... To find out, it simply does this
- Code: Select all
For each entity in the map
   Try to connect the entity with a point far outside the map (the void)  without crossing brush-geometry
   If (able) then
      “entity current_entity leaked!”
      make leak-file starting at current_entity and ending at the void
      end this loop
   end if
Consider next entity
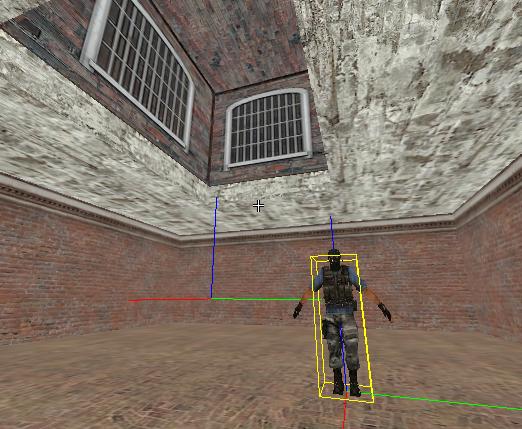
Vbsp connects entities using their ORIGIN. For point-based entities this is represented by a cross ( also seen in above images), for brush-based entities this isn’t shown unless you activate “show helpers” (diamond shaped button top right in hammer), where it is a small circle. This also means ONLY THE ORIGIN NEEDS TO BE IN THE LEVEL. You can have as much of the entity sticking out as you like, as long as the origin is inside you are allright.
This way vbsp checks each entity to find out whether or not they are in touch with the void. Since all entities should be inside the level, any entity in touch with the void generate a leak error. After all, the only way an entity can be connected with the void while inside the level is through a leak. Because the considering loop is ended when an entity in touch with the outside is found, there may be many more leaking entities, which vbsp simply didn’t check. If vbsp would continue (which may seem easier, because you can find more leaks in one go) there might be 1000’s of leaking entities and leak-lines if 1000’s of entities touch the void through the same small leak. It simply wouldn’t be practical.
If you’d place a giant hollowed cube around your map you would disable the leak error message, but still have all the bad shit caused by the leak.
So DON’T.
But wait, what if the entity is placed OUTSIDE the level (by accident)? Then this entity will still leak. After all, it only takes a single entity outside the level to make vbsp think all those outside faces are actually inside!
And what happens when my level has no entities? Then vbsp will still generate a leak error (after all, it wouldn’t be able to determine what is inside and what is outside) but it wont generate a leak-file because there is no entity to start it at. You can’t make anything without a start, it’s simple as that.
If your level consists of separate parts (eg a main level and a skybox, or another part of the level where the player gets teleported to or sees per viewcamera) leaks are considered PER PART. Any part that doesn’t have an entity inside will be deleted (which is logical considering there is no entity inside to tell vbsp that this is a part of the level, thus it gets deleted).
One thing to think about at this point is that (func_)areaportal(window)s can also cause leaks. Areaportals divide the map into different parts. When checking one of these parts, vbsp always considers the other side of the areaportals to be “void”.
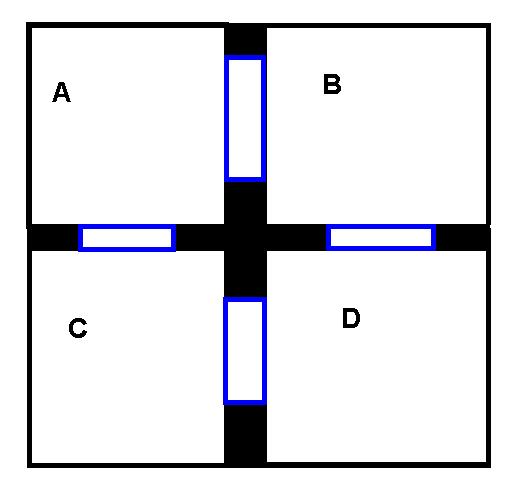
Take this level for example. The (hollow) blue squares are arearportals, the black lines are walls.
Though this level is one level, vbsp treats it as four levels seperately to find leaks. When determining if area A has leaks, it will try to connect any areaportal in area A to the backsides of these areaportals that touch area A (in this case, the sides that touch area C and area B)
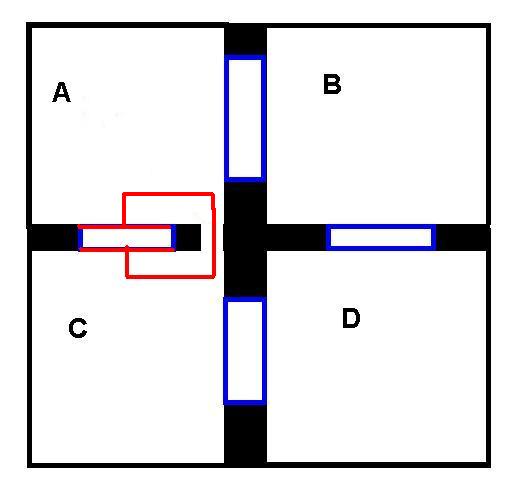
In the next example, area A has leaked because one of it’s areaportals could be connected to the backside of the same areaportal. Please note that there isn’t an area C here, because what previously was area C is now the same area as area A due to the leak.
It may sound odd how this is also called a leak, but it’s logical if you know globally how vbsp works (just trust me on this)
The pointfile
The leak-file (or pointfile) shows the line vbsp made when it was able to connect the leaking entity with the void. The start of the pointfile will be shown in the compile log, and that’s always easy to find using “view->go to coordinates…” in hammer. When fixing your leak, you can follow this line and eventually it will go through the hole that connects the entity to the void.
You can open the pointfile in notepad and see it’s a simple list of coordinates. Unless you are really smart, you cant do much with that, so you better let hammer do the hard stuff and make the editor draw the leak-line in your map.
Go to “map->load pointfile” and find your leakfile(mapname.lin or mapname.pts). When opened, hammer will draw a red line in your map allowing you to find the leak. If you recompile your map, you also need to reload the pointfile manually. Hammer doesn’t update it automatically. If there are no leaks, or the pointfile couldn’t be made, the pointfile is 0 bytes long or doesn’t even exist.
Fixing the leaks
Use the pointfile to find the leaks. However, you cannot always rely on the pointfile (eg when there isnt one made). Then you can use “view->go to coordinates…” and enter the coordinates found in the compile log to find the leaking entity. Then you can decide what to do (eg. if this entity is outside the level->move it inside, or place a brush around its origin). Offcourse, if your map has a hole in it, plug the hole by moving/resizing/adding brushes to it.
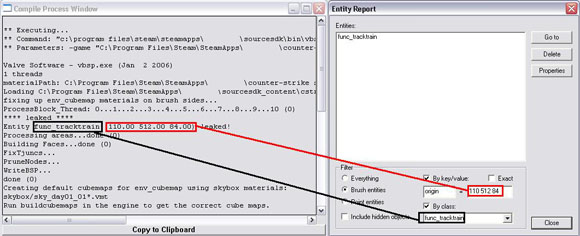
Sometimes the leaks are caused by a brush-based entity’s origin. If that is the case, simply move the origin back to inside the level. You know this is the case if the pointfile starts at a place where there are no entities that could cause the leak. Finding it can be hard if the given brush-based entity is on the other side of the level, but then is easy using entity report (“map->entity report…”):
See?
Hint1: It’s a brush-based entity that leaked, so the class we are looking for is the given (func_tracktrain), and we can set the filter to “brush entities”.
Hint2: Since the origin is given, we can use entity report to search for the origin. The origin of brush-based entities is given in a key called “origin”, so simply search for a key with the found coordinates as value and you have your entity (be aware that the notation may be different: eg “110.00 512.00 84.00” in the compile log and “110 512 84” as the key value
If there are no coordinates given, make sure you are compiling your level with atleast one entity. (eg an info_player_start). A map with no entities ALWAYS LEAKS! Be aware of that when you compile with cordons or disabled visgroups!
Leaks can be hard to find in a cluttered level, so make sure when you start hunting leaks you hide any entities that may obscure the leak(s). Use visgroups for that. They allow you to hide groups of entities very easily. Make sure you hide everything in the auto tab, excluding world brushes.
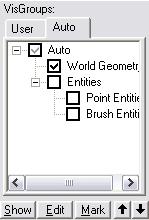
This makes leak-hunting a lot easier!
How to prevent leaks?
This is already the last chapter of this tutorial. Leaks are easily prevented, but you will need to build your level carefully. Some tips:
Don’t build walls with the grid set to 1. Walls and floors and such need to be around 8-16 units thick anways, so just leave the grid at 8 or 16 units (or even bigger) when making walls. Only decrease gridsize when you are making details, and when you are done with that, turn it back up. A 1 unit gap is easily overlooked, contrary to a 16 or 8 unit gap.
When placing entities, make sure their origin is inside the level. Eg, when placing a prop_static, make sure the origin is still inside the level after applying a model. Some models are huge and may move the origin outside your level…
Displacements and func_detail don’t block leaks. Make sure you have nodrawwed world-brushes behind them.
Keep a clear oversight of your level and it’s areaportals (in your head) to make sure they don’t cause leaks.
I hope you now know enough to fix any leak error you may encounter, or atleast where to find it and why you get it
by zombie@computer


