General Half-Life 2/Newbie
description
The building blocks of every level, learn about each in this tutorial.
keywords
primitives, block, cylinder, arch, torus, spike, sphere, primitive.
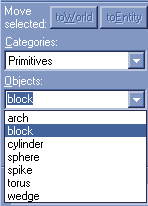
When you select you block tool (shift+b), you will see in the panel on your right two drop down menus, one should say PRIMITIVES, and the other, by default should say BLOCK. If you open the last drop down menu you will have 7 different types of primitives, I will now explain what each one of these do.
1. ARCH
By the name of this primitive you may already suspect of what it does. It basically does arches. With this primitive type selected, draw a square in any of the 2d views, and press enter. A window will pop up after this containing several options.
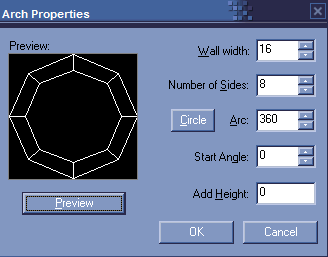
WALL WIDTH: here you need to enter the width of your wall, if for example your connecting two 16 units walls, the arch width should be half of it, so add 8 in that box.
NUMBER OF SIDES: We all know that round things in games aren't really round, they are just a bunch of straight lines, with different angles. So here you will specify how many "straight lines", or sides, your arch will have. The more you add, the more round it will look, but be careful to not overdo it, because it consumes your resources, and may cause errors, since sometimes the brush is to small to be subdivide in so many parts.
ARC: here you add the radius of your arch, so for a circle you would put 360, it all depends on what you want.
START ANGLE: Indicates where your arch origin should be in degrees. Basically or arch will de drawn from this angle in a counter clock wise direction.
ADD HEIGHT: This defines which height each of the blocks, that make the arch, should have from each other. In other words this will make your arch look like round stairs, so had in this field how high you want each step to be.
PREVIEW: when you click in this button, you can see how your arch will look like in the active 2d-view, from the little black screen.
CIRCLE: automatically establishes your ARC field has being 360
This is a very useful tool, as you can see from the image you can create hollow cylinders using it. Also for doing round stairs, or wall corners.
2. BLOCK
There aren't any options, or relevant information about this primitive. If you don't know what it does, then you must probably don't know how to map
Useful for every basic geometry you use in your level, but don't over do it please.
3. CYLINDER
This is a very easy to use primitive, the only thing you need to do is to draw your square in the 2d-view and it enter. If you want your cylinders to look better you can increase the value in the FACES field, just below the objects drop down, this uses the same rules as the "number of sides" in the arch tool.
Cylinders are used most of the times, to do pipes, and columns. Also if you want to do round wall corners, you can cut it, until you just have 1/4 of a cylinder and add it in the desired corner.
4. SPHERE
WOW, one of the coolest new additions to hammer 4.0, back in hammer 3.4/3.5 you would take forever to do one of this, now it just takes a couple of seconds. This works the same way as the cylinder, but it creates a sphere, so just draw a square in the 2d-view, if you really want a sphere make sure your making a square in all 2d-views, and it enter. And there you go a nice looking sphere. If you want to make it look better, just like in the cylinder primitive, increase the faces value.
Spheres had that extra detail to your maps, and you can cut them in half, or quarters, to make more interesting geometry. Just be creative
5. SPIKE
Believe it or not, this primitive creates spikes lo0l, or if you prefer pyramids. Again draw a box in the 2d-view and press enter. You can also change the FACES value for this primitive; which allows you to create cones.
6. TORUS
This is a very new, and full of options primitive, but that allows even more possibilities when doing round geometry, As shown by blink in is recent tutorial about round pipes.
When you use this primitive the following window will show up:
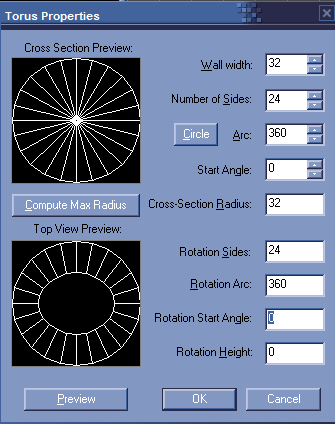
As you can see this window is divided in two parts, the cross section, and the top view. This is what makes this primitive so extremely good, it works in two different views at the same time, which increases the number of possibilities.
This primitive works by picking up a bunch cylinder/arch(cross section), and distribute them accordingly to a certain rotation(top view)
So as you can see the cross section has the same options has the arch tool, except for the last one which determinates the inside width of our section. But to not making it to confusing, and if you don't want to mess with this value just click the COMPUTE MAX RADIUS button and it will determinate that value for you.
Now to the top view, has the name says we will determinate how our brush will look from above. the options are the same as the arch tool really, but with different name.
ROTATION SIDES: number of sides (cross sections) our brush will have.
ROTATION ARC: the angle of our solid in degrees (360 for a circle, 90 for a 90 degrees corner etc..)
ROTATION START ANGLE: angle from which the solid will start from in the 3d view.
ROTATION HEIGHT: each cross section will be whatever number you had here higher then the last(works as stairs)
Has said before there are lots of possibilities in which you can use this tool, it's all just a question of adding the right set-up.
7. WEDGE
Works the same way has the block tool, but divides the brush in half in the active view(it only shows half of it also).
Very useful to create ramps for example, or 45 degrees angled corners.
And that ends it, now go out and get crazy with your brushes. After this there are no excuses to make box maps.
-BaRRaKID-