As for the Bridge, i'd try to reuse copies of the same mesh parts and UV space.
For the not destroyed version i'd say it could be made with 9 Parts.
The destructed version of the bridge makes it quite a challenge though.
But even here i'd say a modular aproach would be the best solution.
In the end, the question is how to create the illusion for the player by using as few resources as possible.
(your time spent on the models is also a resource)
Noone will notice if you're reusing a few pieces of the models if it's done clever.
Ofc. you'll have to avoid to unique features in geometry and texture, that will catch attention if repeated.
Don't try to do very little details like small dents that make each piece unique, rather focus on the big ones, because they'll create the effect for the player.
The player will only recognize the big ones anyway and not if there's a micro dent anywhere else on the bridge.
You could even get away with mirroring a few elements and noone will notice.
And even then, this is just a game with limited resources not a physically correct reality simulation.
Same applies for the pillars.
Do you really think anyone will notice a small dent far away from the players view high that barely changes the geometry?
Be as detailed as neccessary for stuff the player can get close to, but reduce details in areas that are further away.
If the pillars are very long, it might be a good idea to keep a few edge loops in there though, to avoid issues with thin long triangle rendering.
It is currently Thu Apr 18, 2024 11:16 am
Interlopers.net - Half-Life 2 News & Tutorials
Model pimpage Thread
Re: Model pimpage Thread
![]() by kraid on Fri May 02, 2014 12:01 am
by kraid on Fri May 02, 2014 12:01 am
- kraid
- Been Here A While

- Joined: Thu Jan 22, 2009 12:09 pm
Re: Model pimpage Thread
![]() by TicTac on Fri May 02, 2014 3:30 am
by TicTac on Fri May 02, 2014 3:30 am
Hey plague, just wanted to say that you've come a long way since you first joined interlopers. This stuff may seem tough and overwhelming at first, but if you stick with it I think you'll do really well.
Competent Level Designer, 3D Artist.
I don't really look like my avatar
I don't really look like my avatar
-

TicTac - Veteran

- Joined: Sat Aug 02, 2008 1:30 am
- Location: Philadelphia
Re: Model pimpage Thread
![]() by kraid on Fri May 02, 2014 3:21 pm
by kraid on Fri May 02, 2014 3:21 pm
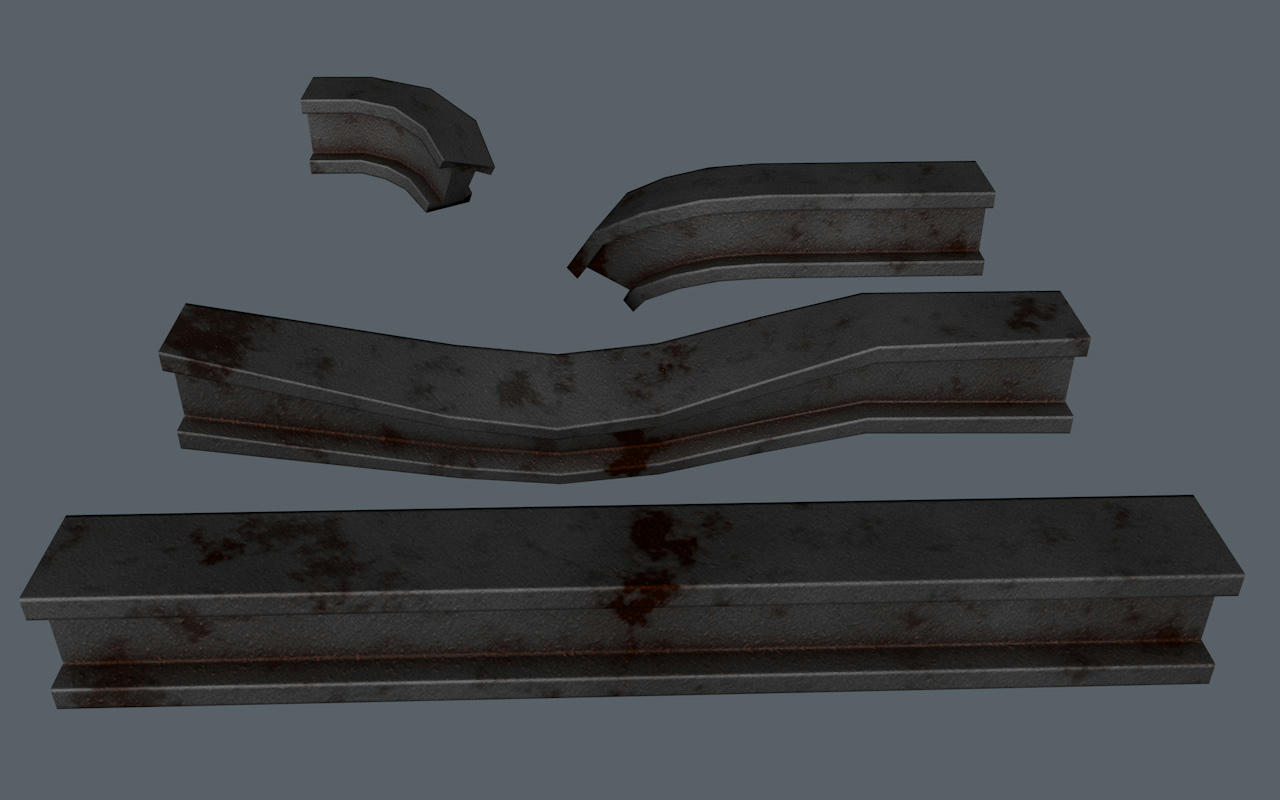
Just an example to show you a few things.
At first i made the Beam in front. Did the UV mapping and texture baking with it.
Then i copied it, rotated it, added a few edge loops and used deformers to alter the shape.
The two on top were done the same way, except i removed parts of the beam after adding the loops.
If you pay attention to the texture now, especially the rust stains, you'll notice that there are a few marks that make it very obviouse that the texture was reused accross these beams.
So better avoid things like this either by not having them at all or by rearranging the UVs for these Parts.
- kraid
- Been Here A While
- Joined: Thu Jan 22, 2009 12:09 pm
Re: Model pimpage Thread
![]() by plagueofburia on Mon May 05, 2014 10:43 pm
by plagueofburia on Mon May 05, 2014 10:43 pm
Hi, thanks Kraid I will take note of the advice when I get round to texturing the bridge just wanted to post an update, there is not much progress, as I am having to redo a lot of parts of the mesh of the bridge. 
It seems I created some of the meshes with non-manifold edges and that is causing UV unwrapping problems. Manifold edges is a new term and is causing me difficulty
This is very tedious long process, sorry bridge won't be done for a while.
Cheers TicTac for the encouragement I really need it.
An example the picture below shows part of a mesh, though it does not unwrap correctly. It seems when one edge is connected to 3 or more faces, will cause a non-manifold edge I believe, which in this case of unwrapping causes a problem. Manifold edges are not necessarily a bad thing I have been told.

I have to go through many parts and redo the mesh to look like this.

Thanks for all the help.
- plagueofburia
- Regular

- Joined: Mon Sep 12, 2011 9:09 am
Re: Model pimpage Thread
![]() by kraid on Tue May 06, 2014 4:45 pm
by kraid on Tue May 06, 2014 4:45 pm
To reduce the ammount of unwrapping and texturing i'd recomend you the following:
Create a small straight piece of your beam and do the UV mapping and texture baking for it.
Now when you are going to create longer beams possibly with deformations too,
Just resize it to be let's say 4 times the length of your original piece.
Set the Tiling for your Material to 4 tiles in U direction.
Now add edgeloops, to divide the mesh into 4 segments.
Take all the UV pieces of each segment and place them exactly (snapping)
onto the UVs of piece 1.
Now you can construct your bridge from these pieces.
If neccessary e.g. for deformation, add more edgeloops and clip the length of the beams by adding
an edgeloop at the point it should end and delete the polygons/vertics behind that point.
Another way to achive the same would be to copy the piece, place it exactly at the end of the other piece combine the meshes and weld the vertics together.
The vital thing is to work non destructive to keep the UV map intact, or else you'll create more work for yourself.
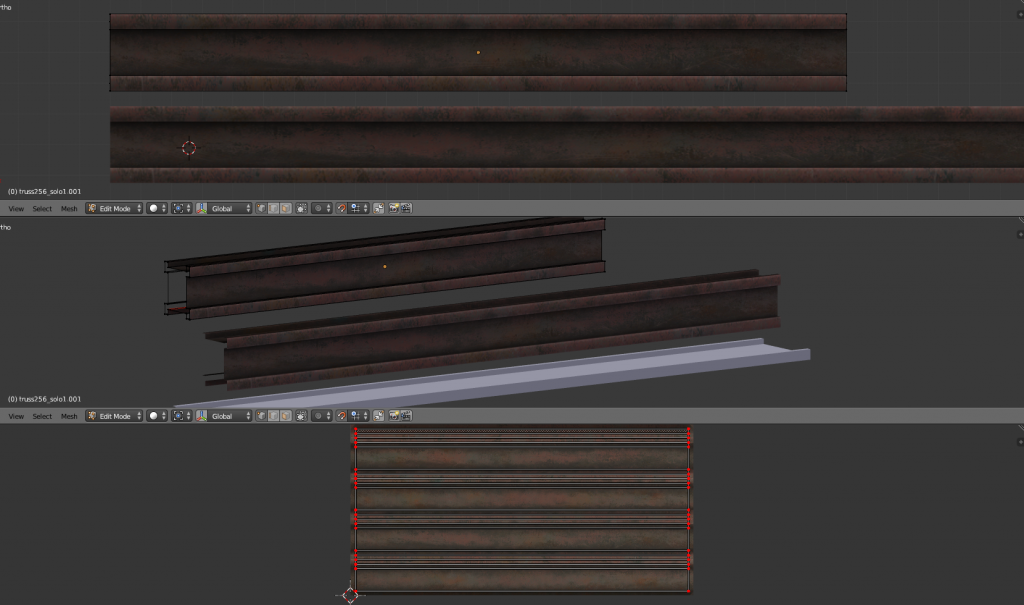
The beam in front is the original length of 256 i used to bake Textures from.
The middle beam is the same geometry 4 times longer with a material that tiles 4 times
and finally the beam on the right is divided into eight segments and has
a Spline deformer/modifier applied that causes the deformation.
Modern engines would open up a lot more possibilities, too.
e.g. instead of doing the tiling in your app, it could be done in the material of the engine,
or additionally for correct shadowing a second UV channel would be created that is used for Lightmap calculation, or vertex painting could be used to blend togeher two textures, one for the base metal and one for more rusty parts.
...but since this is source, just forget about it and rely on per vertex shading or not even this if there is a normalmap on the prop.
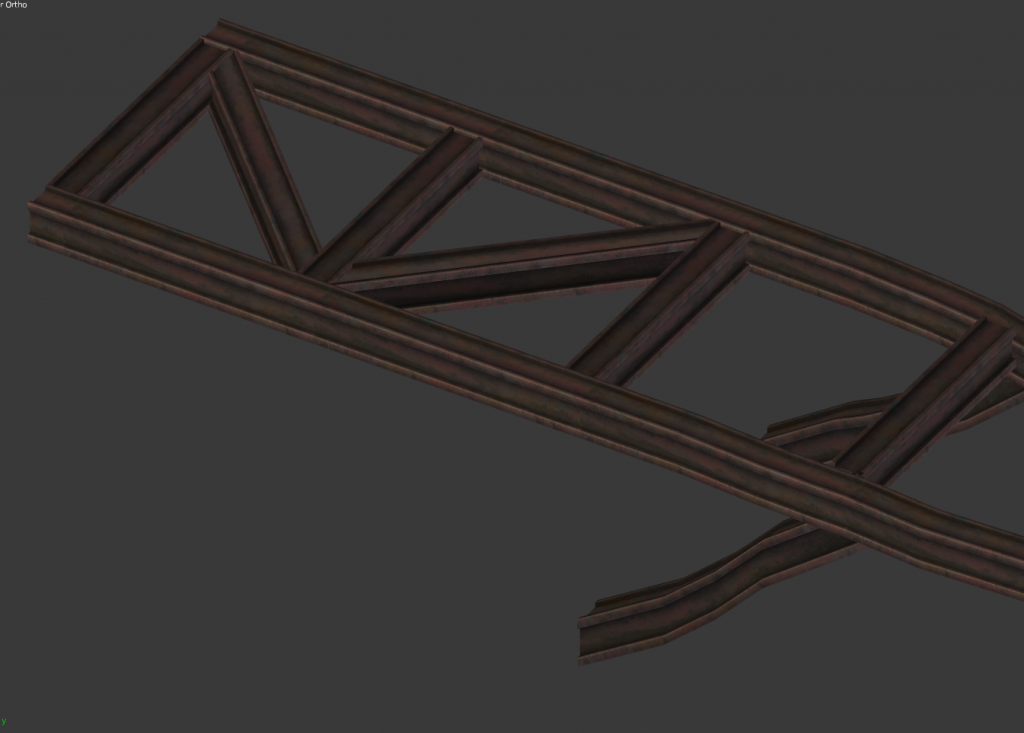
Edit: just a proof of concept:
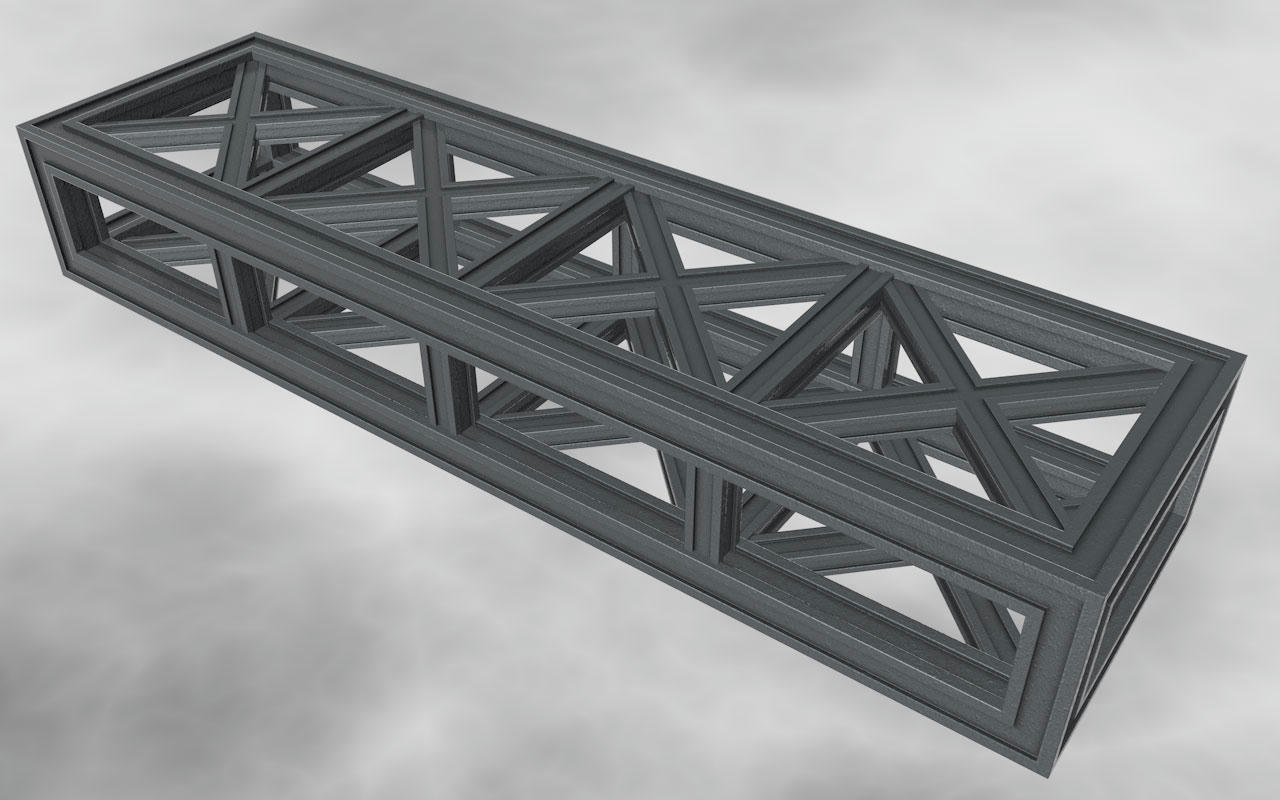
A whole structure composed only of this small beam part by sticking copies of it together, resizing some of them a little and cutting the pieces that intersect and overlap.
Create a small straight piece of your beam and do the UV mapping and texture baking for it.
Now when you are going to create longer beams possibly with deformations too,
Just resize it to be let's say 4 times the length of your original piece.
Set the Tiling for your Material to 4 tiles in U direction.
Now add edgeloops, to divide the mesh into 4 segments.
Take all the UV pieces of each segment and place them exactly (snapping)
onto the UVs of piece 1.
Now you can construct your bridge from these pieces.
If neccessary e.g. for deformation, add more edgeloops and clip the length of the beams by adding
an edgeloop at the point it should end and delete the polygons/vertics behind that point.
Another way to achive the same would be to copy the piece, place it exactly at the end of the other piece combine the meshes and weld the vertics together.
The vital thing is to work non destructive to keep the UV map intact, or else you'll create more work for yourself.
The beam in front is the original length of 256 i used to bake Textures from.
The middle beam is the same geometry 4 times longer with a material that tiles 4 times
and finally the beam on the right is divided into eight segments and has
a Spline deformer/modifier applied that causes the deformation.
Modern engines would open up a lot more possibilities, too.
e.g. instead of doing the tiling in your app, it could be done in the material of the engine,
or additionally for correct shadowing a second UV channel would be created that is used for Lightmap calculation, or vertex painting could be used to blend togeher two textures, one for the base metal and one for more rusty parts.
...but since this is source, just forget about it and rely on per vertex shading or not even this if there is a normalmap on the prop.
Edit: just a proof of concept:
A whole structure composed only of this small beam part by sticking copies of it together, resizing some of them a little and cutting the pieces that intersect and overlap.
- kraid
- Been Here A While
- Joined: Thu Jan 22, 2009 12:09 pm
Re: Model pimpage Thread
![]() by plagueofburia on Wed May 07, 2014 1:24 am
by plagueofburia on Wed May 07, 2014 1:24 am
Wow, thanks for all this help Kraid, that looks great what you have done you could have made so many bridges while I have not even made one.
I decided to follow your advice and build in parts. Today I created a texture for a 256 unit size truss. I am not sure about the texture yet, still getting ideas slight changes.
Below the long mesh I have noticed that if the mesh is 256 units length the bolts look stretched a little. If I resize the mesh to 192 units the bolts seem to look better less stretching. If there was only some way to texture lock to UVs, I am not sure if blender has texture lock I can't see it. If it did I would keep the texture locked to 192 units and work with that on the other meshes. I am not sure if blender works like that.
Pin UVs in blender does not seem to work the way I thought, saw someone say that one should use Zbrush?? Do I really need to do that just for bolts? I could get rid of bolts but I think they work with the truss.
I will follow your outline as best as I can and build the bridge in pieces, starting with the horizontal truss first I will try to finish that.
I decided to follow your advice and build in parts. Today I created a texture for a 256 unit size truss. I am not sure about the texture yet, still getting ideas slight changes.
Below the long mesh I have noticed that if the mesh is 256 units length the bolts look stretched a little. If I resize the mesh to 192 units the bolts seem to look better less stretching. If there was only some way to texture lock to UVs, I am not sure if blender has texture lock I can't see it. If it did I would keep the texture locked to 192 units and work with that on the other meshes. I am not sure if blender works like that.
Pin UVs in blender does not seem to work the way I thought, saw someone say that one should use Zbrush?? Do I really need to do that just for bolts? I could get rid of bolts but I think they work with the truss.

I will follow your outline as best as I can and build the bridge in pieces, starting with the horizontal truss first I will try to finish that.
- plagueofburia
- Regular
- Joined: Mon Sep 12, 2011 9:09 am
Re: Model pimpage Thread
![]() by kraid on Wed May 07, 2014 3:11 am
by kraid on Wed May 07, 2014 3:11 am
Looking good so far. No need for a sculpting software like zBrush.
On a model like this one it would be like killing a fly with a nuklear warhead.
The 256 length was just an example, if it works better on 192 for you, stick with that.
I could tell you at least 3 possibilities how to get bolts with the exact messurement onto the texture,
but i guess at the moment it would distract to much from the main thing.
Also a lot of stuff is case depending, e.g. if you ain't got a Normalmap for rounded corners,
there's no need to split the faces of the beam on each hard edge.
If you're going to combine all the mesh parts of the bridge onto one big texture sheet,
your UVs won't use the whole space from left to right border.
If you're aiming for more variation, you might not even stack all the UVs of every single beam
onto the same UV space and rather have two, three, or even more variations.
- kraid
- Been Here A While
- Joined: Thu Jan 22, 2009 12:09 pm
Re: Model pimpage Thread
![]() by plagueofburia on Fri May 09, 2014 2:21 am
by plagueofburia on Fri May 09, 2014 2:21 am
Hi, cheers kraid, cool Zbrush is over kill : ) I have taken the bolts off for now, the bolts is something that can be created near the end I hope.
So far on the bridge, I have used one texture so far, still might change the design, it has a slight red look to it I am not sure about the look.
Working this way so far is very different than my previous efforts (previous models). I am mostly using the knife tool to shape this one mesh adding edge-loops and moving vertices. I still need to get used to working this way. Unless some one would have said that I don't think I would have ever thought creating a textured model would be done in this way.
Visual representation of the advice one is saying is great it really helps, cheers Kraid.
What do you suggest the next step is? seamless texture ? But then do I have to go to all the meshes and redo the UVs to stretch to the bounds of the texture?
In addition I don't know how to tackle the broken pieces, as they have insides, they are more complex than the standard trusses so far. I might also need to fix the broken pieces of the mesh as they have the manifold edge problem.
I am noticing some things in the texture is not seamless at the moment perhaps that should be the next thing to do get one seamless texture see how that works with all the trusses thus far.
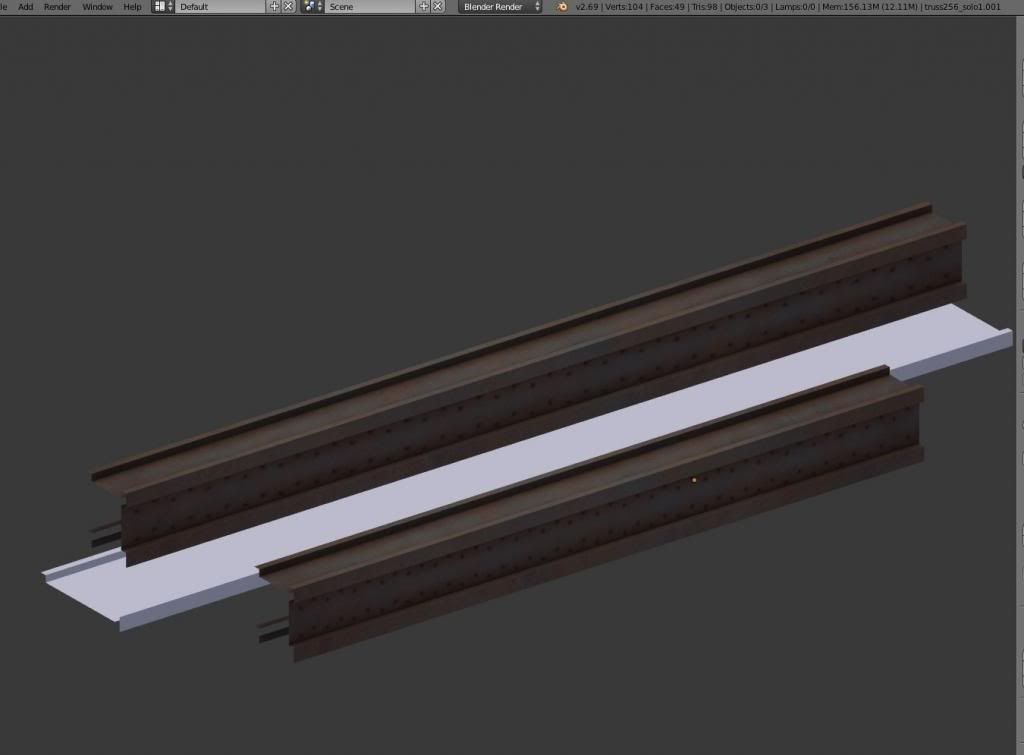
This is a 192 units with those UV coordinates the UV's do not reach the sides yet. I used the 192 unit and with the knife tool reshaped this one truss into the shape I have made so far.
The mesh is set to Smooth shading there seems to be strange shadows appearing
This is the same two meshes and the shading is set to Flat and the shadows seem to be gone, I am not sure why this is, the vertex and face normals seem to be okay.
So far on the bridge, I have used one texture so far, still might change the design, it has a slight red look to it I am not sure about the look.
Working this way so far is very different than my previous efforts (previous models). I am mostly using the knife tool to shape this one mesh adding edge-loops and moving vertices. I still need to get used to working this way. Unless some one would have said that I don't think I would have ever thought creating a textured model would be done in this way.
Visual representation of the advice one is saying is great it really helps, cheers Kraid.
What do you suggest the next step is? seamless texture ? But then do I have to go to all the meshes and redo the UVs to stretch to the bounds of the texture?
In addition I don't know how to tackle the broken pieces, as they have insides, they are more complex than the standard trusses so far. I might also need to fix the broken pieces of the mesh as they have the manifold edge problem.

I am noticing some things in the texture is not seamless at the moment perhaps that should be the next thing to do get one seamless texture see how that works with all the trusses thus far.

This is a 192 units with those UV coordinates the UV's do not reach the sides yet. I used the 192 unit and with the knife tool reshaped this one truss into the shape I have made so far.


The mesh is set to Smooth shading there seems to be strange shadows appearing

This is the same two meshes and the shading is set to Flat and the shadows seem to be gone, I am not sure why this is, the vertex and face normals seem to be okay.

- plagueofburia
- Regular
- Joined: Mon Sep 12, 2011 9:09 am
Re: Model pimpage Thread
![]() by kraid on Fri May 09, 2014 5:39 pm
by kraid on Fri May 09, 2014 5:39 pm
Ofc. you have to create a tileable texture for this approach.
If you need to shorten a part to make it fit, always shorten it in a way that tiling is not affected.
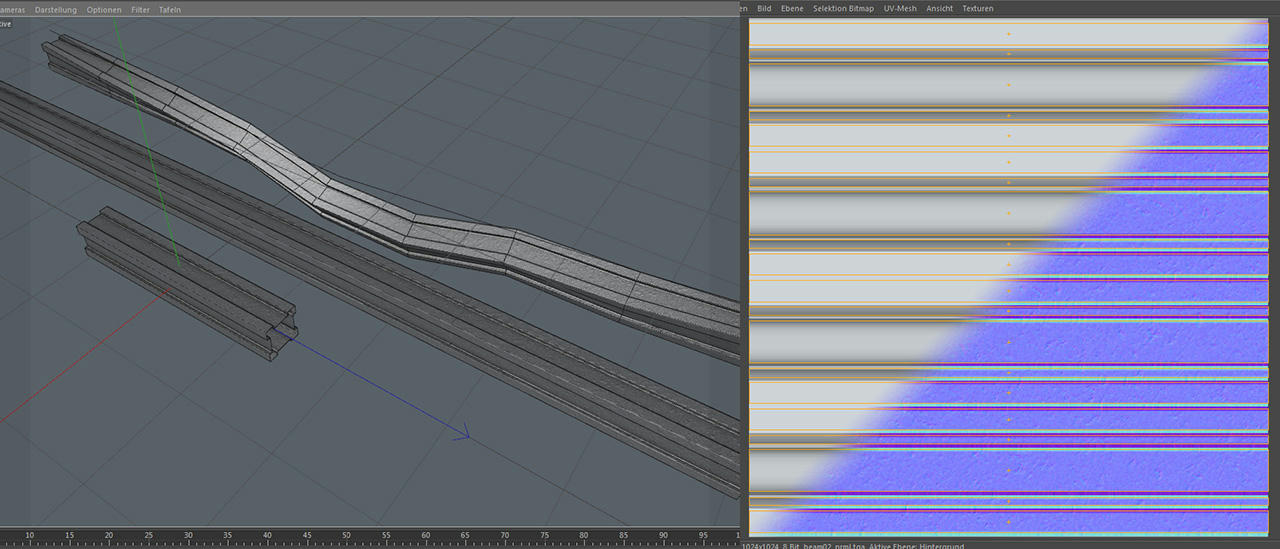
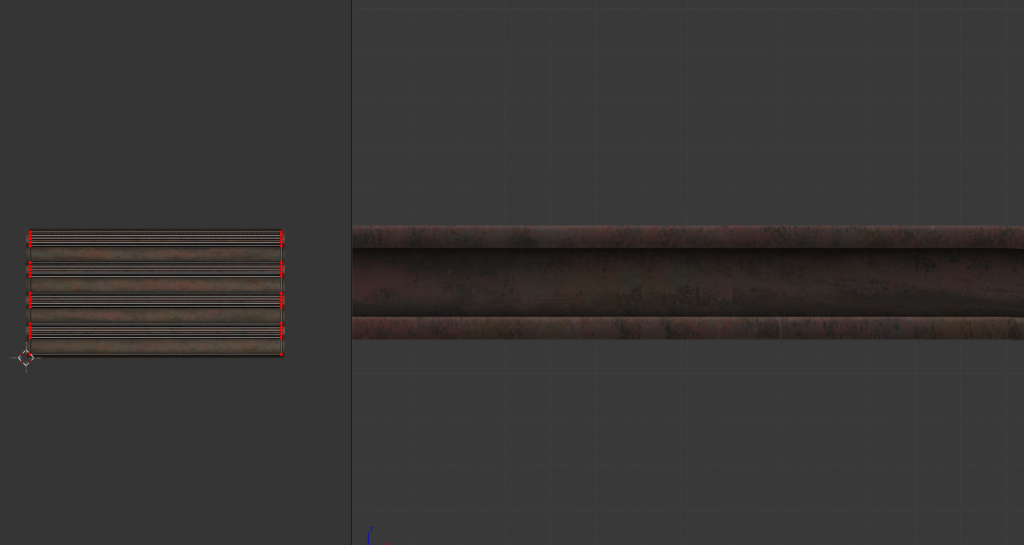
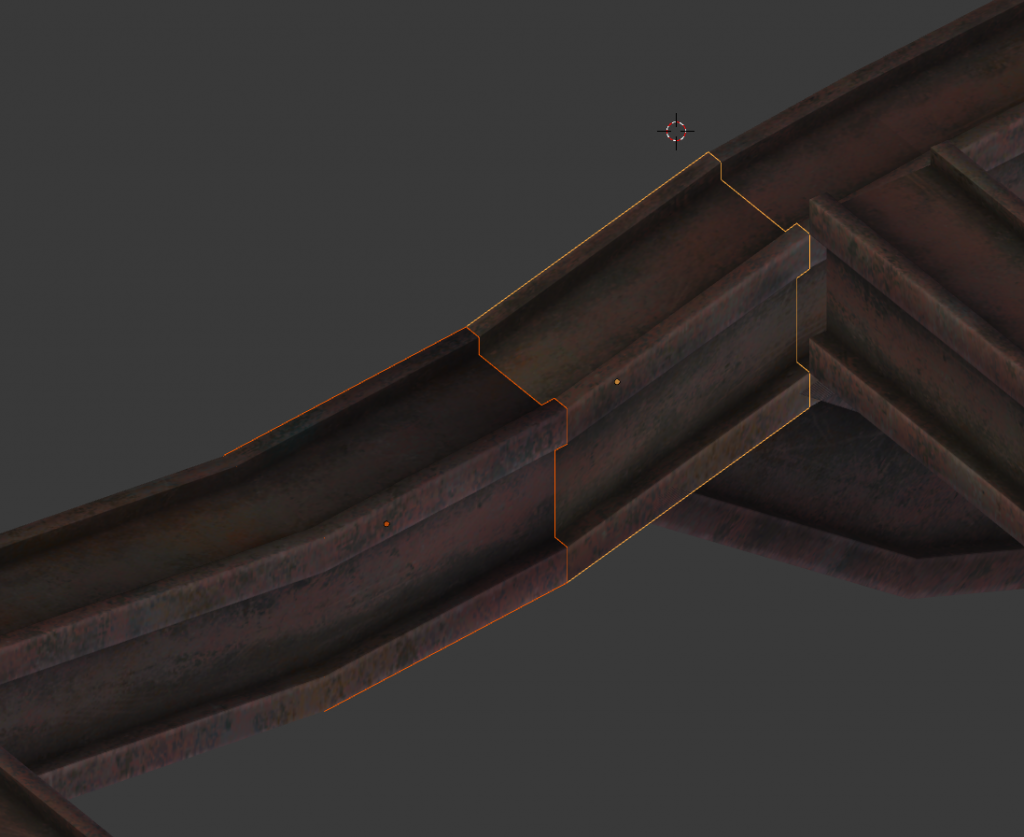
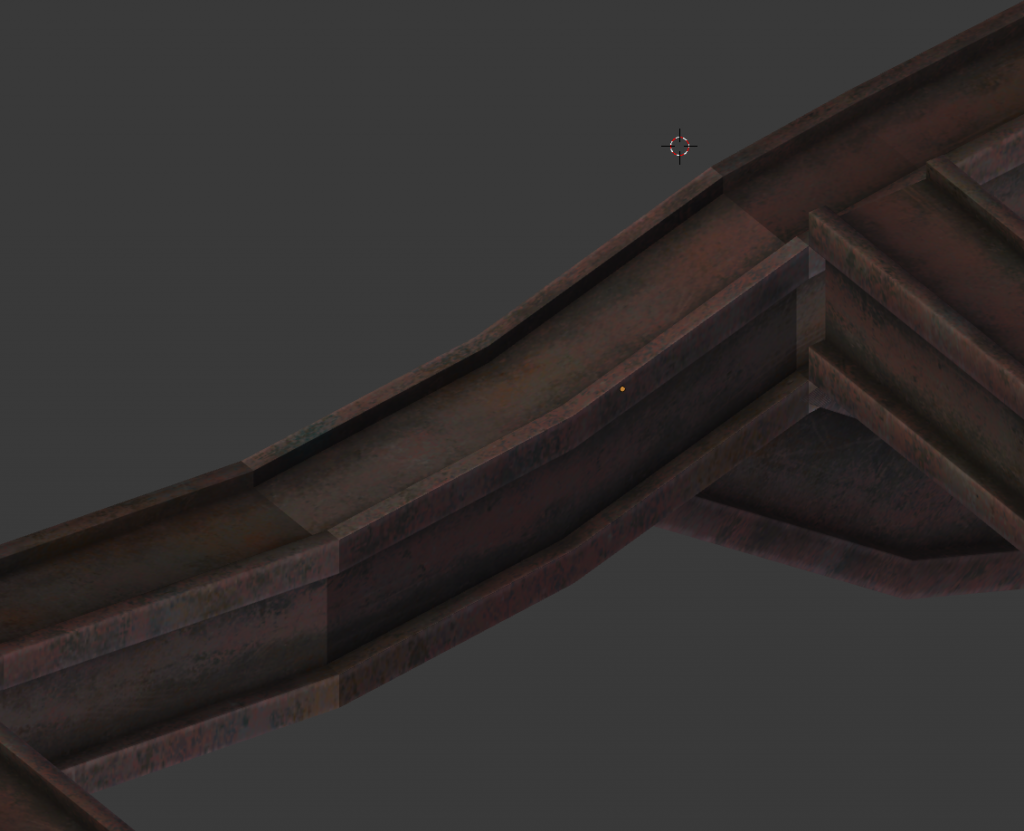
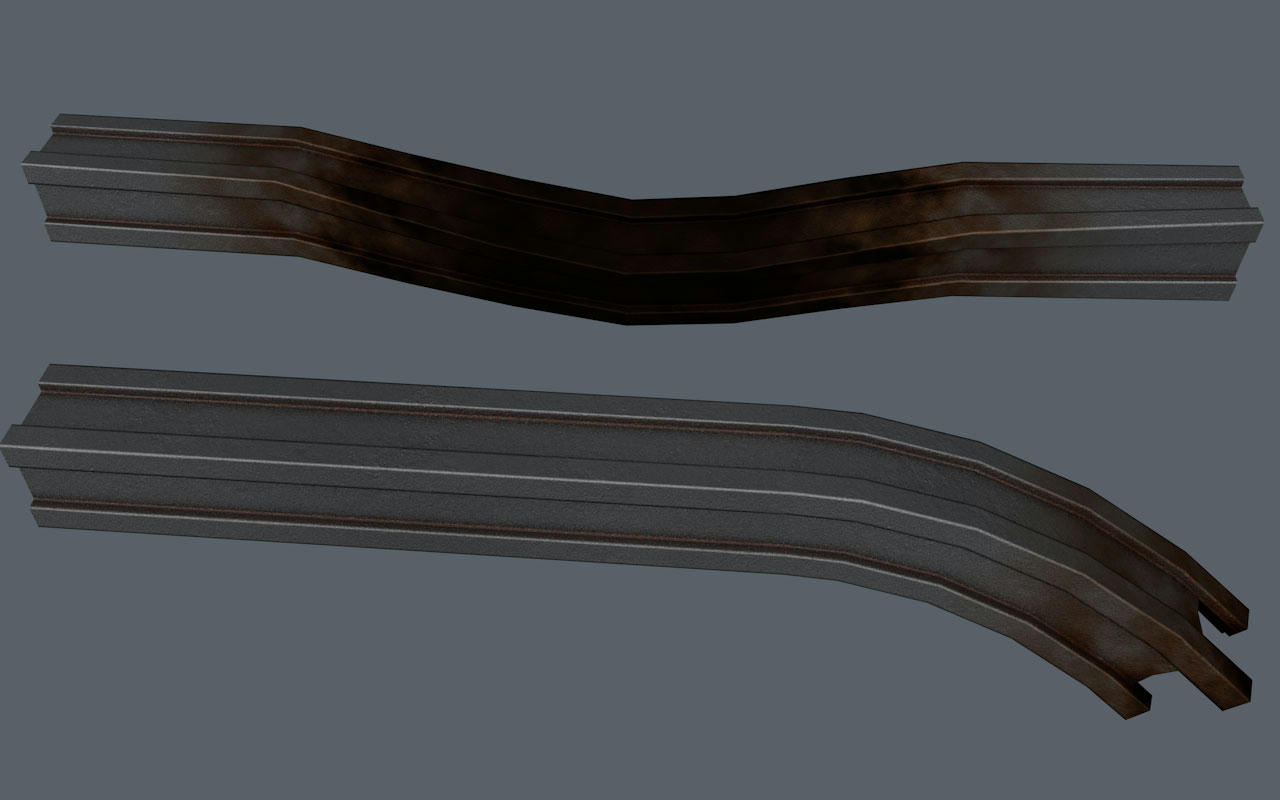
For endcaps and broken parts where you can see the inside...
....you'll need to reserve some space on your UV map for the caps too.
Like i did here:
Note that i seperated the UVs for every hard edge for the sake of propper normalmapping the chamfer and that they take up the whole U space from left to right border just because i didn't need to add much more to this UV space then the beam.
On a prop without normalmap i'd stitch the UVs together of course and if there were more mesh parts that need UV space, i wouldn't use the whole space left to right for the beam.
As for the broken parts, you might want to use a copy of the same basetexture for the outer shell so it tiles with the rest of the mesh and create additional texture on a free spot in your UV map for it.
Might be also a good idea to create only 1-2 broken base meshes and do the same knife & deform trick on them.
The issue with shading on the mesh might be because of vertics that haven't been weld together or some issue with your smoothing group definition.
Make sure that everything looks ok smoothing wise by disabling texture in the viewport.
If you need to shorten a part to make it fit, always shorten it in a way that tiling is not affected.
For endcaps and broken parts where you can see the inside...
kraid wrote:
....you'll need to reserve some space on your UV map for the caps too.
Like i did here:
 beams_uv.jpg
- (240.71 KiB) Not downloaded yet
Note that i seperated the UVs for every hard edge for the sake of propper normalmapping the chamfer and that they take up the whole U space from left to right border just because i didn't need to add much more to this UV space then the beam.
On a prop without normalmap i'd stitch the UVs together of course and if there were more mesh parts that need UV space, i wouldn't use the whole space left to right for the beam.
As for the broken parts, you might want to use a copy of the same basetexture for the outer shell so it tiles with the rest of the mesh and create additional texture on a free spot in your UV map for it.
Might be also a good idea to create only 1-2 broken base meshes and do the same knife & deform trick on them.
The issue with shading on the mesh might be because of vertics that haven't been weld together or some issue with your smoothing group definition.
Make sure that everything looks ok smoothing wise by disabling texture in the viewport.
- kraid
- Been Here A While
- Joined: Thu Jan 22, 2009 12:09 pm
Re: Model pimpage Thread
![]() by plagueofburia on Fri May 16, 2014 9:15 pm
by plagueofburia on Fri May 16, 2014 9:15 pm
Cheers kraid for all the help.
I will take this advice
This has taken very long I think a week, to UV unwrap these parts, this is only the trusses. I have found this frustrating. I am sorry this is going very slow.
Blender related----------------
There are some tools or functions I wish blender had, this was all done buy hand moving each vertex. I found out about, follow active quads recently but so far I have not had the chance to use that yet. Apparently if used correctly it would have saved me sometime. Though overall UV unwrapping is long. If Blender had copy UV Island to other Island that could have saved me a many days of time gone. It is not the same as copying the mesh, it is a different thing UV island copy is a feature I am not sure if it exists in any other 3D program but I sure needed it here. Though to put into a program would be difficult if UV unwrapping is done by seams the program would have to copy those seams to the copied mesh. Also what would happen if the mesh is different, having different vertices/edgeloops and faces the program would need to know that. I am sure it could be done some how it needs this function. Or I just don't know
how to use blender effectively yet.
Blender related end--------------------
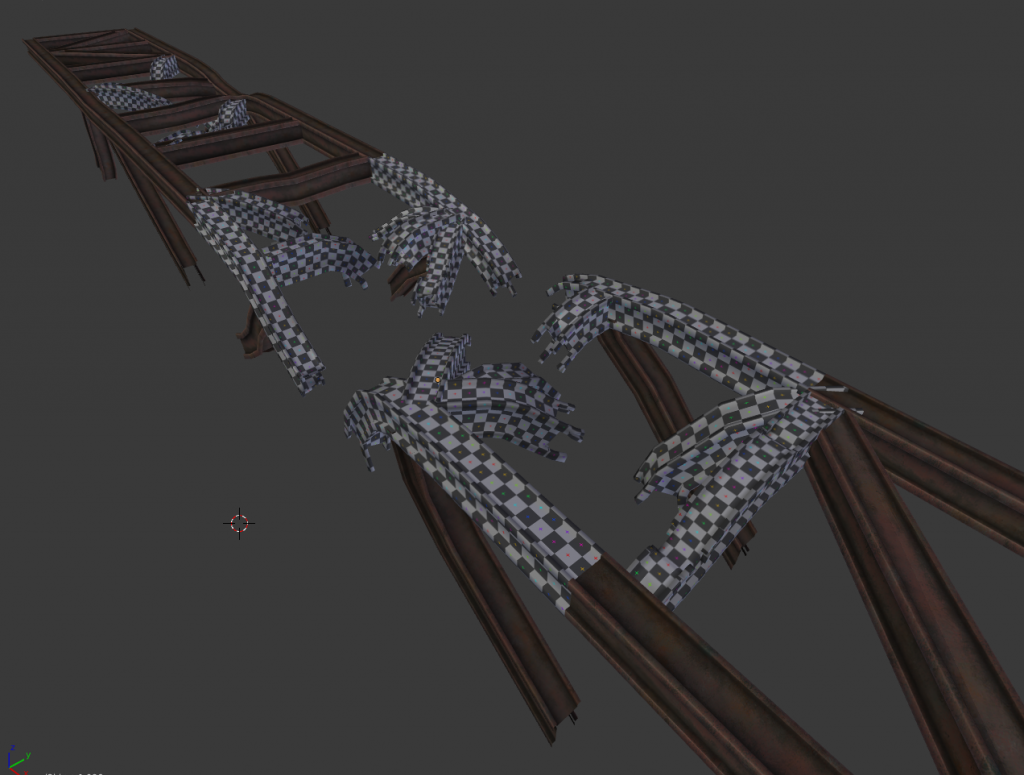
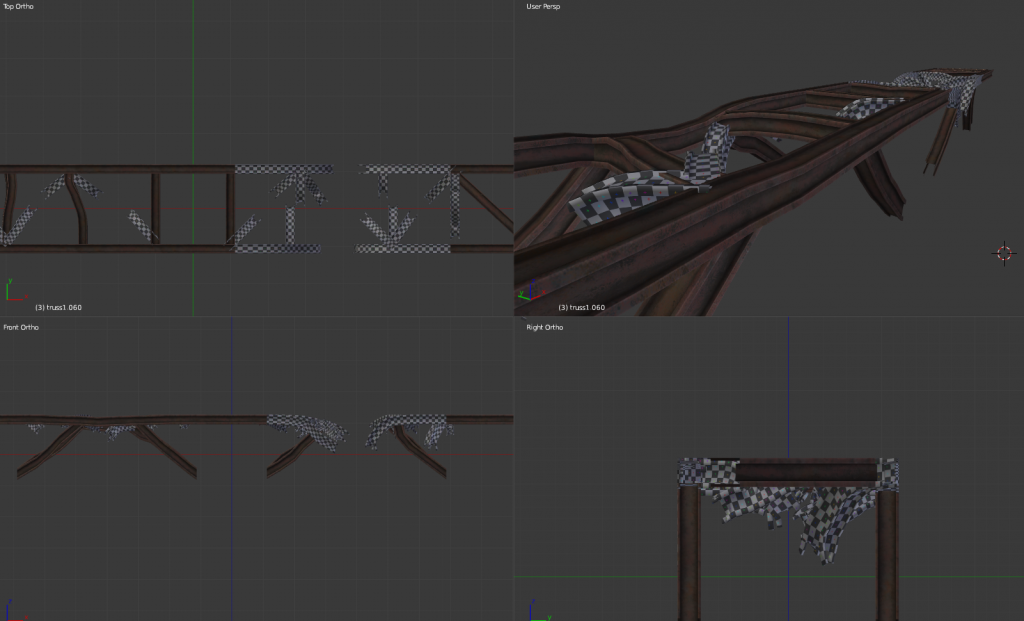
Anyway, I tried to arrange one UV sheet to function as a sheet that acts as many 8-10 different meshes this proved difficult I have something that seems to work though it might not. For the broken truss parts I split the truss to an outer and inner mesh with their UV parts. The ends of the truss are separate and then lastly the long broken parts of the truss are once again separate.
As this sheet is larger than the normal trusses H512xW1024, these broken trusses are larger due to inner parts and long extruding bars H1024xW1024 they are not going to align properly with the height which is going to be another problem I am sure of it.
I have created a seamless texture for the normal trusses and stretched them to the ends of the texture it seems to be okay for now.
-Next thing I need to do is the texture for the broken trusses.
-Then UV unwrap the X truss create a texture for that.
-lastly the end caps, UV unwrap and texture.
-Also the bolts, I need bolts though I don't think bolts can go on the texture as each truss is stretched differently it will look very odd, there has got to be some other way, when I get to that I hope there is a solution.
Next I will create a texture for the broken trusses. Do you think that is the next best step? Thanks again for all the help. Hopefully now it won't take as long to finish as the UV wrapping is nearly over.
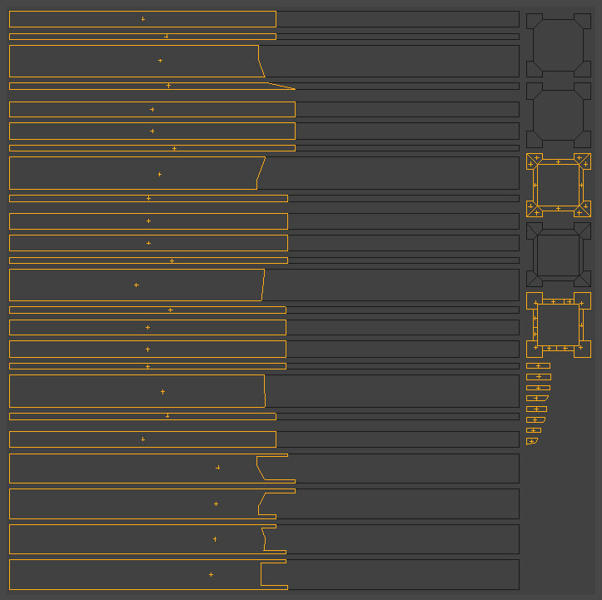
This the is the UV layout for all the broken trusses, there is about 8 different meshes overlaid, it looks like a mess but I am hoping the texture I make will fit correctly
The broken trusses UV mapped
As for the broken parts, you might want to use a copy of the same basetexture for the outer shell so it tiles with the rest of the mesh and create additional texture on a free spot in your UV map for it.
Might be also a good idea to create only 1-2 broken base meshes and do the same knife & deform trick on them.
I will take this advice
This has taken very long I think a week, to UV unwrap these parts, this is only the trusses. I have found this frustrating. I am sorry this is going very slow.
Blender related----------------
There are some tools or functions I wish blender had, this was all done buy hand moving each vertex. I found out about, follow active quads recently but so far I have not had the chance to use that yet. Apparently if used correctly it would have saved me sometime. Though overall UV unwrapping is long. If Blender had copy UV Island to other Island that could have saved me a many days of time gone. It is not the same as copying the mesh, it is a different thing UV island copy is a feature I am not sure if it exists in any other 3D program but I sure needed it here. Though to put into a program would be difficult if UV unwrapping is done by seams the program would have to copy those seams to the copied mesh. Also what would happen if the mesh is different, having different vertices/edgeloops and faces the program would need to know that. I am sure it could be done some how it needs this function. Or I just don't know
how to use blender effectively yet.
Blender related end--------------------
Anyway, I tried to arrange one UV sheet to function as a sheet that acts as many 8-10 different meshes this proved difficult I have something that seems to work though it might not. For the broken truss parts I split the truss to an outer and inner mesh with their UV parts. The ends of the truss are separate and then lastly the long broken parts of the truss are once again separate.
As this sheet is larger than the normal trusses H512xW1024, these broken trusses are larger due to inner parts and long extruding bars H1024xW1024 they are not going to align properly with the height which is going to be another problem I am sure of it.
I have created a seamless texture for the normal trusses and stretched them to the ends of the texture it seems to be okay for now.
-Next thing I need to do is the texture for the broken trusses.
-Then UV unwrap the X truss create a texture for that.
-lastly the end caps, UV unwrap and texture.
-Also the bolts, I need bolts though I don't think bolts can go on the texture as each truss is stretched differently it will look very odd, there has got to be some other way, when I get to that I hope there is a solution.
Next I will create a texture for the broken trusses. Do you think that is the next best step? Thanks again for all the help. Hopefully now it won't take as long to finish as the UV wrapping is nearly over.
This the is the UV layout for all the broken trusses, there is about 8 different meshes overlaid, it looks like a mess but I am hoping the texture I make will fit correctly

The broken trusses UV mapped


- plagueofburia
- Regular
- Joined: Mon Sep 12, 2011 9:09 am
Re: Model pimpage Thread
![]() by kraid on Sun May 18, 2014 9:29 am
by kraid on Sun May 18, 2014 9:29 am
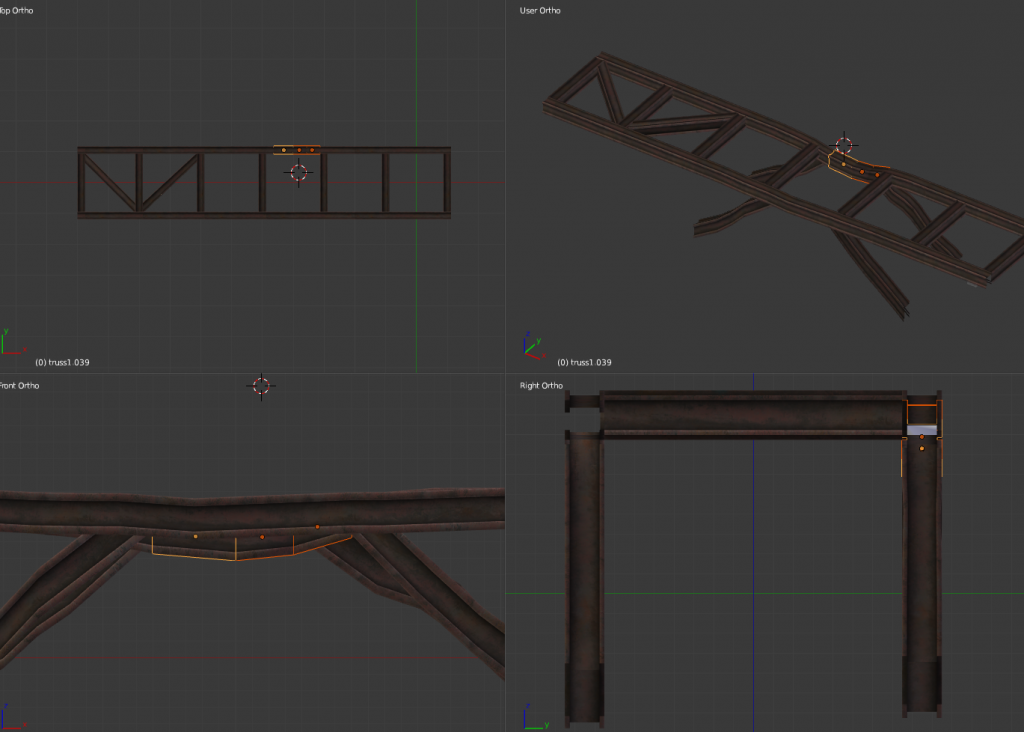
I've done another Example.
The basic modular beams:
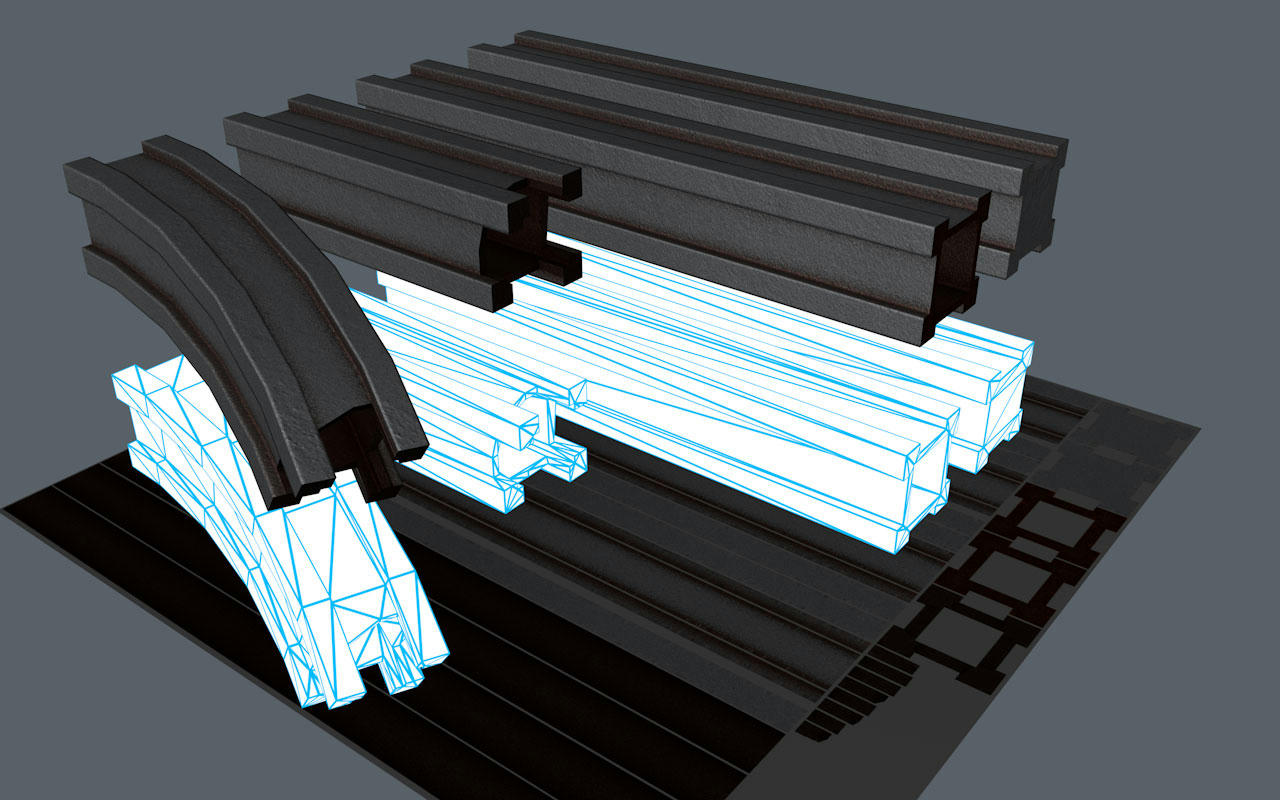
a second diffuse texture with a rusty overlay:
example beams constructed from these parts:
For better understanding here's the UV:
The UVs of the broken beam are the ones with the orange colored lines.
So all 3 variants share the same Texture.
The hollowed beams are using the 4 additional UV islands at the bottom and of course the caps with the hole in it.
The broken Piece uses the same side elements, but only a part of them.
It also has one additional front cap and a few more small islands.
Theoretically i could have put them somewhere on the regular beam side texture,
but since there's still some left over UV space i just put them there.
As you can see, i even did the UV map with ngons instead of quads or triangles.
But it would work with quads or even triangles the same way, just a matter of looking cleaner
and beeing faster to edit.
The mapping i started with simple box mapping and then rearranged the Parts.
As i said before, because i'm using a soft edge shader (biomekks edgeshade) for creating the beveled
looking edges with a normalmap, i had to split the UVs on every hard edge of the model.
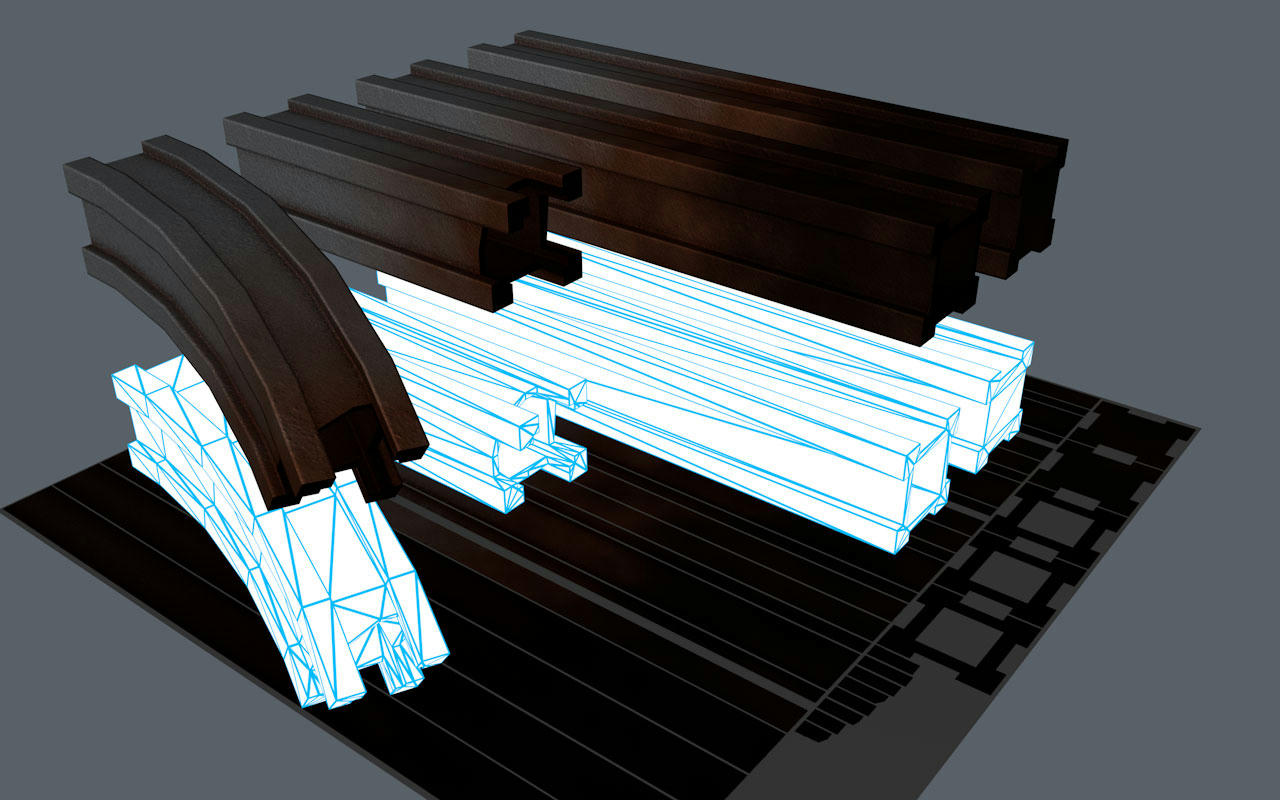
One more example or combining the pieces:

e.g. if you wanna have a little bit of rust in areas where the beams meet each other.
If this would really go ingame, i'd also try to combine the two diffuse maps onto one sheet,
e.g. by reducing the beam length to 128 instead of 256 or using a bigger texture sheet like 1024x2048.
Preferably the first solution, since it saves texture memory by only slightly increasing the polycount.
Dubbled on regular straight pices, but since the deformed ones need additional edgeloops anyway,
it won't be that much more in the end.
The basic modular beams:
a second diffuse texture with a rusty overlay:
example beams constructed from these parts:
For better understanding here's the UV:
The UVs of the broken beam are the ones with the orange colored lines.
So all 3 variants share the same Texture.
The hollowed beams are using the 4 additional UV islands at the bottom and of course the caps with the hole in it.
The broken Piece uses the same side elements, but only a part of them.
It also has one additional front cap and a few more small islands.
Theoretically i could have put them somewhere on the regular beam side texture,
but since there's still some left over UV space i just put them there.
As you can see, i even did the UV map with ngons instead of quads or triangles.
But it would work with quads or even triangles the same way, just a matter of looking cleaner
and beeing faster to edit.
The mapping i started with simple box mapping and then rearranged the Parts.
As i said before, because i'm using a soft edge shader (biomekks edgeshade) for creating the beveled
looking edges with a normalmap, i had to split the UVs on every hard edge of the model.
One more example or combining the pieces:
e.g. if you wanna have a little bit of rust in areas where the beams meet each other.
If this would really go ingame, i'd also try to combine the two diffuse maps onto one sheet,
e.g. by reducing the beam length to 128 instead of 256 or using a bigger texture sheet like 1024x2048.
Preferably the first solution, since it saves texture memory by only slightly increasing the polycount.
Dubbled on regular straight pices, but since the deformed ones need additional edgeloops anyway,
it won't be that much more in the end.
- kraid
- Been Here A While
- Joined: Thu Jan 22, 2009 12:09 pm
Re: Model pimpage Thread
![]() by marks on Sun May 18, 2014 7:26 pm
by marks on Sun May 18, 2014 7:26 pm
Yeah seriously, this stuff is awesome. Really impressive how much you've improved in such a small amount of time kraid 
-

marks - Creative Assembly

- Joined: Tue Aug 16, 2005 5:07 pm
Re: Model pimpage Thread
![]() by kraid on Mon May 19, 2014 9:34 am
by kraid on Mon May 19, 2014 9:34 am
Me? guess you're talking about plagueofburia.
I just gave him examples on how i'd do it, from a technical point of view.
If i were really going to create something like this, i'd spend more time in polishing geometry and textures.
Right now it looks very plain, basic and unnatural, but it's ok since it's only an example.
I just gave him examples on how i'd do it, from a technical point of view.
If i were really going to create something like this, i'd spend more time in polishing geometry and textures.
Right now it looks very plain, basic and unnatural, but it's ok since it's only an example.
- kraid
- Been Here A While
- Joined: Thu Jan 22, 2009 12:09 pm
Re: Model pimpage Thread
![]() by marks on Thu May 22, 2014 8:49 am
by marks on Thu May 22, 2014 8:49 am
And that's what I get for not proof reading xD
-
marks - Creative Assembly
- Joined: Tue Aug 16, 2005 5:07 pm
Re: Model pimpage Thread
![]() by Kanine01 on Fri May 23, 2014 3:27 am
by Kanine01 on Fri May 23, 2014 3:27 am


I think I'm just about ready to call this done. I'm moving on to bigger and better things.
-

Kanine01 - Regular
- Joined: Wed Apr 20, 2011 7:10 pm
Who is online
Users browsing this forum: No registered users