Prison Guard Area

Tutorial collection, comprehensive listings on main site.

Prison Guard Area

Postby Tutorial on Tue Apr 18, 2006 6:52 pm

category
General Half-Life 2/Architecture

description
Takes you through constructing the prison guard booths seen in dm_lockdown.

keywords
prison, guard, prison guard, area, window, nova, prospekt.

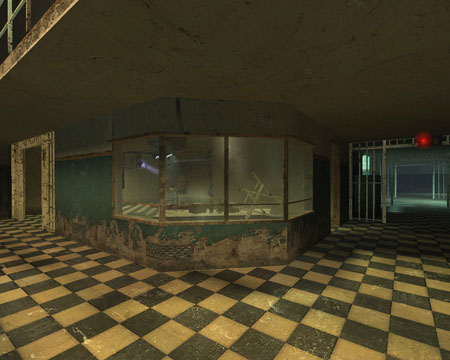
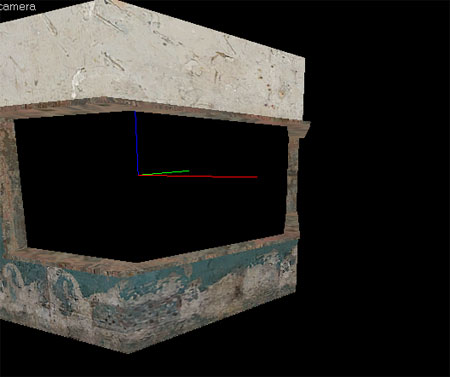
Have you seen those guard areas in dm_lockdown and parts of Nova prospekt? We will be recreating the slanted wall with the window and bars in exactly the same fashion that Valve have used.

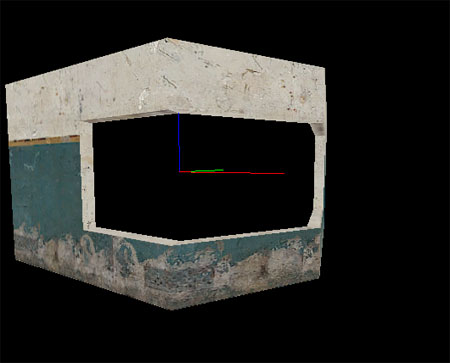
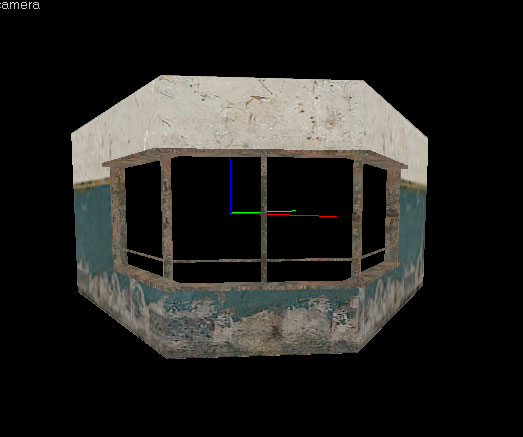
Here is the window in game:

Image

Image

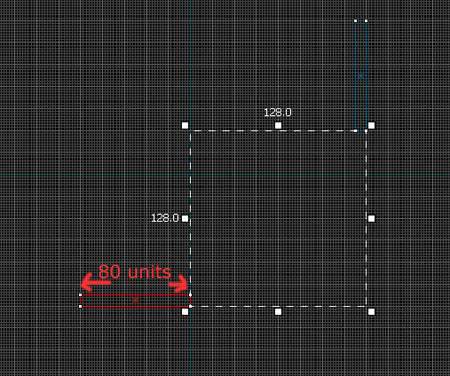
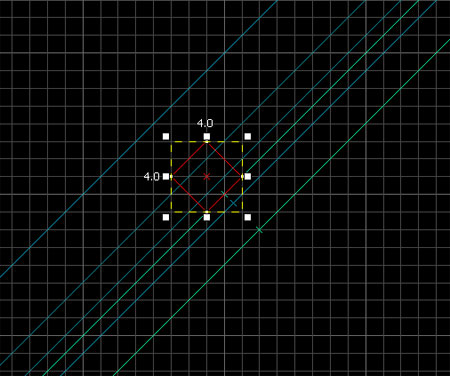
First of all setup two walls, 128 units high and 80 units long, and 16 wide. Set them at 90 degrees to each other with a square space in the middle of 128 units. Like the below:

Image

Image

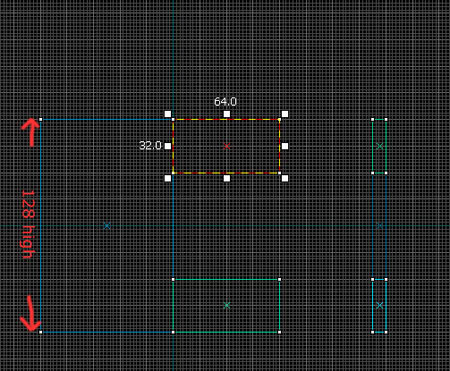
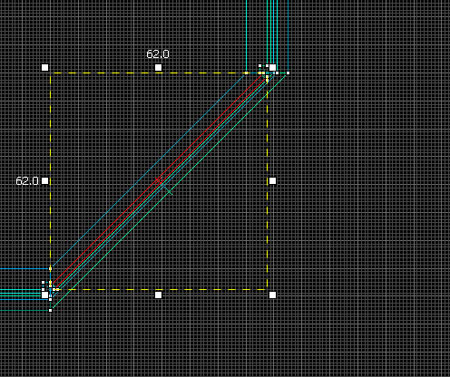
Once you have done that it’s time to add the surrounding walls for the window frame. Add two brushes next your wall, and make them 64 units wide and 32 units high, place one at the bottom and one at the top, do this both sides and this will act as the window frame area.

Image

Image

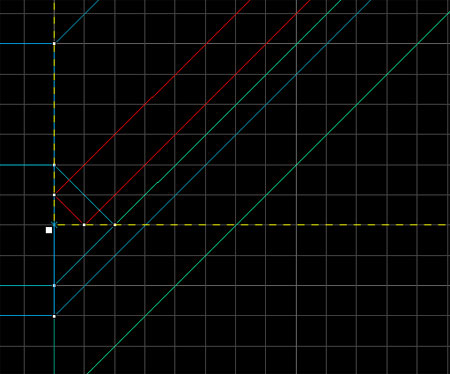
Now we need to add the slanted area to connect the two pieces. Clone one of you blocks you just made, the top one will do for now and then click on it until the third set of manipulation handles appear. Now drag it up to meet the other wall and clip off the excess. Clone it and use it for the bottom area. Remember this method as you will need it for other parts.

Image

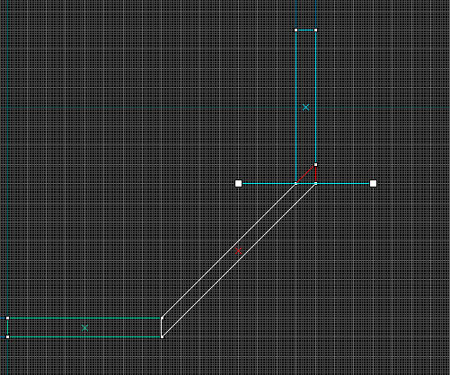
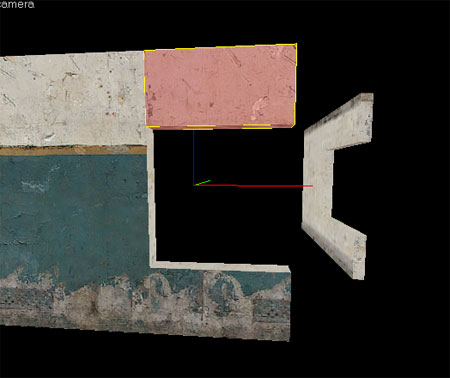
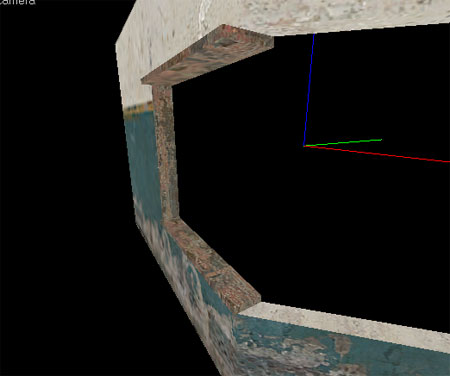
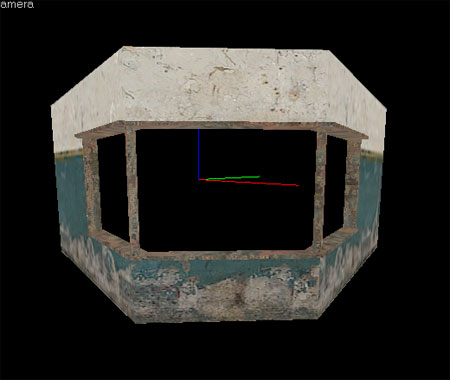
Once you have done that the basic outline of the window area should be ready to go:

Image

Next is adding a window frame to the walls.

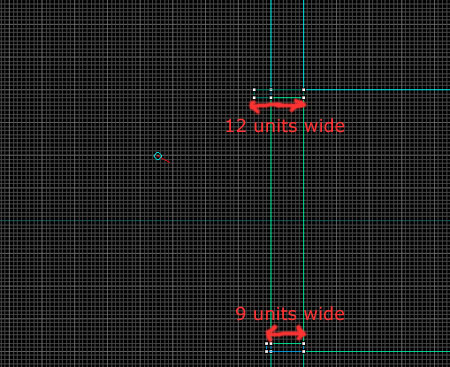
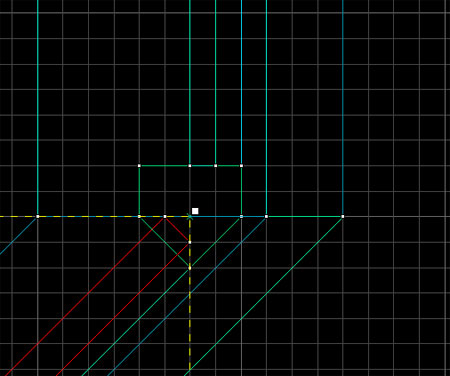
Create thin brushes in the opening that are two units thick. The top one overlaps by 4 units on the outside edge and the bottom one pokes out by 1. They are flush againt it on the inside edge.

Image

Image

Complete this for the other side as well so that you are left with both sides complete and a space in the centre

Image

Now using the same method as when you copied the centre walls, you need to clone a top part of the frame and manipulate that into the centre, do it for the bottom as well and the basic frame is complete.

Image

We now need to setup a supporting part each side of the centre part. These are easy but require a bit of vertex manipulation to complete.

Setup a brush from top frame to bottom frame with the same thickness as below:

Image

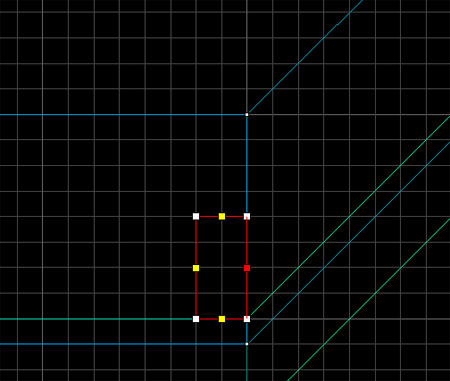
In vertex manipulation mode click on the central right vertice and press CTRL-F and this will split the face and allow you to drag out the right side to form the below shape.

Image

The slant on that post will be where the centre parts connect.

Repeat this for the other side (or clone it and rotate) and then the frame is almost done:

Image

Next we need to add the horizontal dividers that separate the two panes of glass. To achieve this drag a brush that is 1 unit wide and 60 units long and slot it between the edge of the frame and the newly created support pillars.

Image

Image

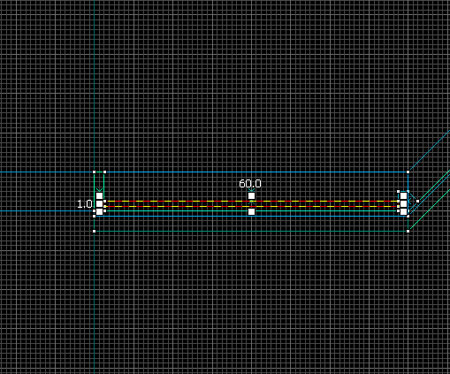
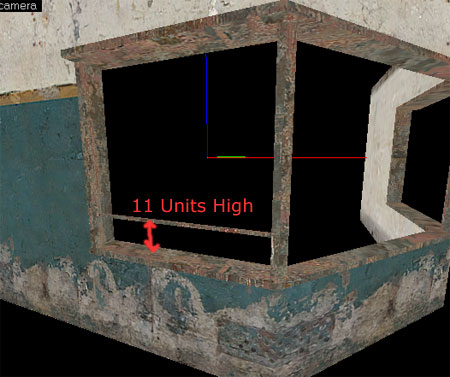
Have this 11 units above the bottom frame section and repeat it for the other side. Once you have done this you can now create the centre section. You can either use the same method as before and vertex the edges so it becomes square, or simply copy the brush or rotate it to 45 degrees. Whatever way you choose it should overlap by a unit at each end.

Image

Image
Image

And finally to finish off the frame parts just a centre pole, create the brush and rotate it to 45 degrees like so

Image

Now the whole frame should look like this:

Image

Creating the glass is the easiest part as the glass is actually the same dimensions of the horizontal bars you created a moment ago. Simply clone this and re-size it into position and then add a glass texture. It is a separate glass brush for the bottom and top, do not use one otherwise it will show as overlapping.

Image

Repeat that technique of cloning for all the other parts and you should be left with the glass in place and the frame done:

Image

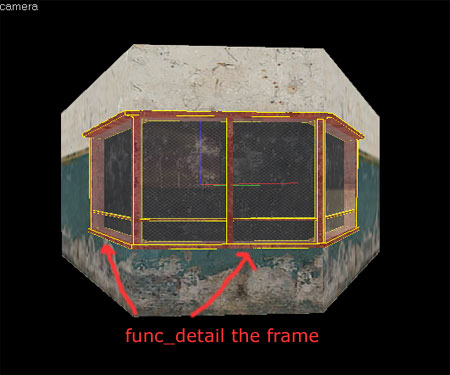
Remember to func_detail the frame as well, easy.

Blink
- Don't send PM's to this user -
Tutorial
Not A Real User
 
Joined: Sun Mar 06, 2005 11:00 pm

Postby slayera on Tue Apr 18, 2006 10:08 pm

You could get away with func_detailing all the walls, since none it of will stop vis and will stop the bsp work from cutting up vis. I might leave the two side walls if there was an open area or doorway behind it. Maybe add a hint across it in the middle, so when your off to the side vis won't see past it.
Image


"When one person suffers from a delusion it is called insanity. When many people suffer from a delusion it is called religion." -Robert Pirsig
User avatar
slayera
Veteran
Veteran
 
Joined: Wed Dec 08, 2004 3:15 am
Location: Near the world's only super volcano.

Postby Blink on Sun Apr 23, 2006 10:37 pm

slayera wrote:You could get away with func_detailing all the walls, since none it of will stop vis and will stop the bsp work from cutting up vis. I might leave the two side walls if there was an open area or doorway behind it. Maybe add a hint across it in the middle, so when your off to the side vis won't see past it.


Would all depend on the designers intentions behind the window etc, I've just covered the construction of the frame and window.
User avatar
Blink
Cool 'n that
Cool 'n that
 
Joined: Fri Oct 08, 2004 4:16 pm
Location: UK

Postby Ozzies_house on Mon May 08, 2006 4:23 pm

i cant wait to start using slanted walls in my levels!!! :)
Ozzies_house
Member
Member
 
Joined: Thu Mar 10, 2005 7:27 pm

Postby Wear_Dark on Thu May 11, 2006 2:00 pm

Don't know if this is the right spot to post this or not....

But what are the textures you used for the frame and the window?

I want to maintain as much consistency as I can.

Thanks.
User avatar
Wear_Dark
Member
Member
 
Joined: Tue Mar 28, 2006 9:37 pm
Location: Toronto Ontario Canada

Postby Blink on Thu May 11, 2006 2:12 pm

The frame is metal/metalwall062a and the glass is glass/glasswindow007a
User avatar
Blink
Cool 'n that
Cool 'n that
 
Joined: Fri Oct 08, 2004 4:16 pm
Location: UK

Postby Viceman on Tue May 30, 2006 8:59 am

hmm.. youre doing the walls wrong, if you see 7th image ( http://www.interlopers.net/images/hl2tu ... entre1.jpg ). The 45 degree wall is not as thick as others.

You should do the walls this way:
Image

:roll:
User avatar
Viceman
Regular
Regular
 
Joined: Fri Dec 31, 2004 5:52 am

Postby Blink on Tue May 30, 2006 9:06 am

Obviously yes but if you read the first line:

"We will be recreating the slanted wall with the window and bars in exactly the same fashion that Valve have used."

I thought some smartass might bring that up, check the Valve map to see for yourself.

:roll:
User avatar
Blink
Cool 'n that
Cool 'n that
 
Joined: Fri Oct 08, 2004 4:16 pm
Location: UK

Postby Viceman on Wed May 31, 2006 5:36 am

Blink wrote:Obviously yes but if you read the first line:

"We will be recreating the slanted wall with the window and bars in exactly the same fashion that Valve have used."

I thought some smartass might bring that up, check the Valve map to see for yourself.

:roll:


Yep, i've seen those thingies in Valve maps, but if they dont want to do it properly does it mean that you must also do it 'wrong'? Why cant you just be little more precise and do it littlebit better. :wink:
User avatar
Viceman
Regular
Regular
 
Joined: Fri Dec 31, 2004 5:52 am

Re: Prison Guard Area

Postby NoFace on Sun Feb 20, 2011 2:55 pm

Because I have never noticed anything wrong with them in the Valve maps so there is not point wasting time on it.
<Enter witty message here>
User avatar
NoFace
Member
Member
 
Joined: Sat Jan 30, 2010 9:54 pm

Re: Prison Guard Area

Postby Smurftyours on Sun Feb 20, 2011 6:36 pm

This is your post date
NoFace on Sun Feb 20, 2011 7:55 am

This is the last post date
Viceman on Tue May 30, 2006 10:36 pm

The year of your post
2011

The year of the last post
2006


DON'T DO THE CRIME IF YOU CAN'T TAKE THE TIME
jangalomph wrote:Wise words from a wise man. ^
User avatar
Smurftyours
Senior Member
Senior Member
 
Joined: Tue Aug 04, 2009 6:11 pm
Location: California, US.

Re:

Postby poisonic on Sun Feb 20, 2011 6:44 pm

Viceman wrote:hmm.. youre doing the walls wrong, if you see 7th image ( http://www.interlopers.net/images/hl2tu ... entre1.jpg ). The 45 degree wall is not as thick as others.

You should do the walls this way:
Image

:roll:


that was the same thing i wanted to put here thanks :P
[img:400]http://mypsn.eu.playstation.com/psn/profile/poisonic.png[/img]
User avatar
poisonic
Pheropod
Pheropod
 
Joined: Tue Jan 20, 2009 5:10 pm

Re: Prison Guard Area

Postby NoFace on Sun Feb 20, 2011 6:46 pm

Well yes, the post was pointless, I didn't look, but it does no harm does it?
<Enter witty message here>
User avatar
NoFace
Member
Member
 
Joined: Sat Jan 30, 2010 9:54 pm

Re: Prison Guard Area

Postby Smurftyours on Sun Feb 20, 2011 7:09 pm

No, it doesn't do any harm, I'm just trying to tell you to be aware of post dates to make sure you don't bump topics. This is also a tutorial and bumping it is hardly a problem if you have something important to say.
jangalomph wrote:Wise words from a wise man. ^
User avatar
Smurftyours
Senior Member
Senior Member
 
Joined: Tue Aug 04, 2009 6:11 pm
Location: California, US.

Return to Tutorials

Who is online

Users browsing this forum: Google [Bot]