Model pimpage Thread

Modelling, Textures, Animating and other general engine asset topics.

Re: Model pimpage Thread

Postby plagueofburia on Sun May 25, 2014 2:14 am

Thanks Kraid, the example/s help. I would not have got this far without the advice you have provided.

If this would really go ingame, i'd also try to combine the two diffuse maps onto one sheet,


This made me re-think what I am doing, from looking at your layout I decided to re-work the design of the truss texture. It did mean redoing everything once again.

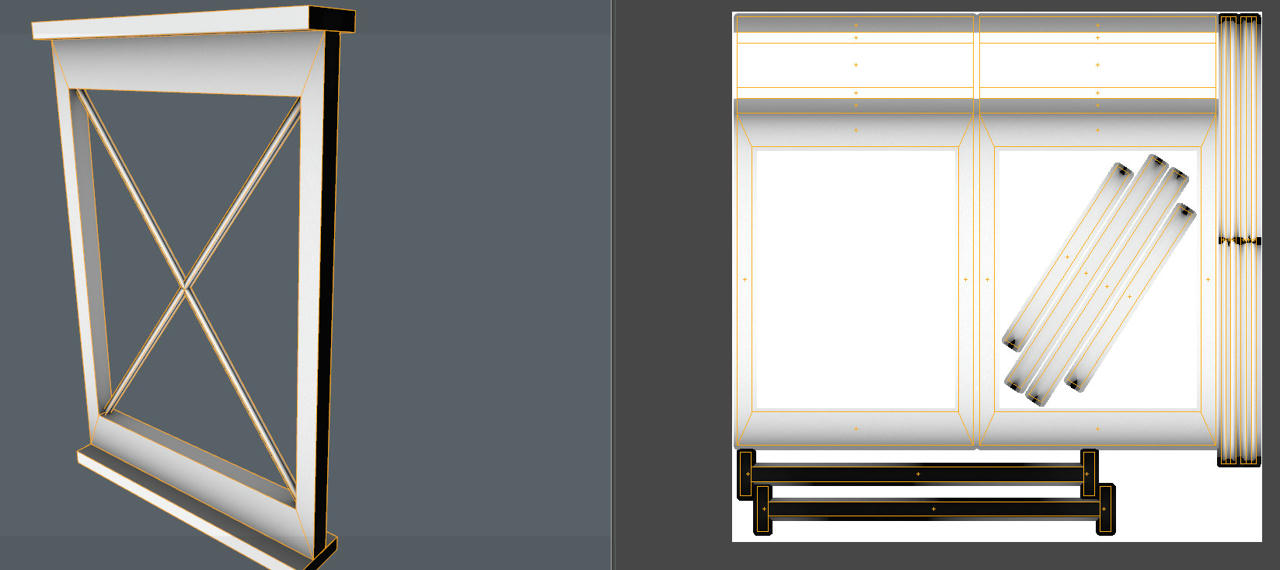
I have completely redesigned the texture to a more red-ish painted scratch style. Now all the base trusses can fit on 1 texture sheet. The details in the texture are much more clearer. If I can add a specular map or a normal map then that might improve it even more.

The mapping i started with simple box mapping and then rearranged the Parts.
As i said before, because i'm using a soft edge shader (biomekks edgeshade) for creating the beveled
looking edges with a normalmap, i had to split the UVs on every hard edge of the model.


I have not heard of splitting the UV's due to a hard edge, yet. In blender I think this maybe possible to UV's regarding smooth and flat shading with edge sharp but I have not used that function yet so I do not fully understand. Though I did not use a bevel on these truss meshes. Wouldn't adding a bevel create more geometry to the mesh? The texture I created simulates a bevelled edge with painted edges. I do not think I would need these truss parts to have a bevel. I would like to add a bevel but I think there is already too many vertices.

This update is the trusses only, the tools I am using I find irritating some what, it could be that I do not fully understand the tools such as Blender well enough to do something as large as this in a short amount of time but what ever the case is the results are going slow for me.

The new more detailed texture, I split the texture into 3 rows, the two lower rows are seamless rows they represent The outer, inner parts of the truss. the top row is miscellaneous parts and the end parts of the trusses.
Image

Though this still could have turned out better. There is an issue in the size of the texture sheet , the texture size is 1024x1024. The problem is that I realised late, that I could move UV faces around. By keeping them pinned I can UV unwrap continuously and preserve the previously unwrapped UV's. I did and proved at first to be very helpful, though after the 20th truss it became very tedious. The problem is that the top row the miscellaneous row is now hardly used because I moved most of the faces from there onto the outer truss section. And in doing means the texture sheet is not utilised very well.

This bridge is a learning experience. The sheer size of it and trying to make everything fit, using as less UV sheets as possible is making this frustrating. There are some crazy angles and crazy knife cuts to the mesh and then linking those warped/skewed meshes to others warped/skewed meshes to line up, is not simple even with vertex/edge/face snapping. And this is only the trusses, however I do like the details on this new bridge design even more so than the HL2 episode 2 bridge model at the start of the first area.

Would a bump map of this texture be a good normal map? These trusses are created from a low polygonal mesh.

In source using specular and normal affects shadows so I do not know what to add. I guess this is a process that can be decided later on.

The trusses are still not finished though I will try and get this done but this week.

What does one think the next step should be? Start on the X type trusses?

Should I add variation to the texture I already have, have 2 types of textures slightly different, or keep it like it is?

---------

-I still need to complete the X type trusses- UV unwrap and Texture

-The Truss caps-UV unwrap and texture

-The bolts??

I think the trusses should be modular should be split into 4-5 different modular parts is that a good idea?

This is the bridge unfinished. X truss still needed and end caps of truss
Image

I even split the truss texture so there is an underside on the outer truss where dirt has accumulated differently.
Image

closer look at the details.
Image

Inside the trusses
Image

Image

Image

Image

Image

Image
plagueofburia
Regular
Regular
 
Joined: Mon Sep 12, 2011 9:09 am

Re: Model pimpage Thread

Postby kraid on Sun May 25, 2014 10:30 am

Looking at your model/texture i'd say you won't need a normalmap at all, at least not for faking a beveled edge.
The diffuse texture allready does a good job with that. Btw: awesome texture.
Also keep in mind that a normalmap prevents models to have per vertex lightning even if -StaticPropLighting is activated in the advanced compiling parameters of vrad.

Since some parts of your bridge are covered with brushwork and other models, it might be a good idea to use vertex lighting though.

I'd do the truss the same way like the beams, creating a basic intact truss with texture, then copy and edit it to fit the rest of the model.
Goldeneye Source v4.2.3
get it now and play for FREE!!!
http://www.goldeneyesource.net
kraid
Been Here A While
Been Here A While
 
Joined: Thu Jan 22, 2009 12:09 pm

Re: Model pimpage Thread

Postby Kanine01 on Sat May 31, 2014 2:58 am

Image

wip
User avatar
Kanine01
Regular
Regular
 
Joined: Wed Apr 20, 2011 7:10 pm

Re: Model pimpage Thread

Postby [KIRBY] on Sat May 31, 2014 4:30 am

Image
Image

Work in progress

tasklist:
-complete optimization, its at 4k now
-fix the grip
-unwrap
-texture
-rig
-animate
User avatar
[KIRBY]
Regular
Regular
 
Joined: Tue Dec 17, 2013 1:59 pm
Location: Manchester

Re: Model pimpage Thread

Postby Kanine01 on Sun Jun 01, 2014 6:22 am

Image

first bake done
User avatar
Kanine01
Regular
Regular
 
Joined: Wed Apr 20, 2011 7:10 pm

Re: Model pimpage Thread

Postby plagueofburia on Wed Jun 04, 2014 9:42 pm

Cheers kraid, okay probably won't use a normal map then.

This additional bridge support has been difficult to unwrap, it is all I have been doing. Some days I feel to give up but I have carried on. I am not sure why it has been this difficult as the main shape is just a cube. Though I have had to move nearly every vertex manually. I am sure this could have been more accomplished more simply/quicker with better understanding of tools and UV.

To UV unwrap I used project from view and have laid the UVs with front and back parts. Some of the seams need re-working but after spending more than 20-30 hours probably even double than that. I am not in a hurry to fix anything even though I am not happy with the results. I have something now I can work with at 2048x2048 I could cut it down to 1024 but for now I will go with 2048 texture.

I have noticed some of the bridge models from L4D1&2 HL2 use a max texture size of 1024 but mine is 2048. One of the L4D bridges just uses a plain 512x512 for a bridge that is extremely large. Up close the model it is not very good though. I probably have made a poor choice, I have spent very long on this, I don't really know what to do, I will just continue and hope it turns out okay.

This texture sheet covers 5 pieces front and back that stretch 1720 hammer units , the other 5 that make up the rest of the bridge not shown will just be a mirror of these. I plan to make them modular or in parts
Image

How would one of attempted to unwrap this part of the bridge support?

Would one of done it in pieces?

What does one think of the Unwrap I have now?

There are also strange black parts in he AO this could be due to the mesh intersecting each other and multiple meshes laid on top when AO bake texturing but I am not sure.

I will try to fix the AO when creating the texture. Is this a good idea?

Image

Image
plagueofburia
Regular
Regular
 
Joined: Mon Sep 12, 2011 9:09 am

Re: Model pimpage Thread

Postby kraid on Thu Jun 05, 2014 6:31 am

I'd do it just like the Beams.
Model and unwrap one part, then go from there.

Example:
Image

Ofc. if you want you can also do two or three of the frames instead of one.
Just make sure the Texture of the second/third part tiles with the first part again.
Goldeneye Source v4.2.3
get it now and play for FREE!!!
http://www.goldeneyesource.net
kraid
Been Here A While
Been Here A While
 
Joined: Thu Jan 22, 2009 12:09 pm

Re: Model pimpage Thread

Postby plagueofburia on Fri Jun 06, 2014 5:30 pm

I am redoing the whole mesh again I have used your advice. I have a 1 texture at W512 H2048 I could make it W512 H1024. Either way I am going to need another texture sheet for the broken parts/extra parts not seen yet.

There are 2 different sizes for these supports but I stretched and used knife tools to make them fit the dimensions I needed.

The main parts of the truss can now be textured seamless in UV they are for the front and back parts.

Image

These need a smaller separate texture sheet
Image
plagueofburia
Regular
Regular
 
Joined: Mon Sep 12, 2011 9:09 am

Re: Model pimpage Thread

Postby kraid on Fri Jun 06, 2014 8:06 pm

Good progress so far.

Instead of 512x2048 you could make it 1024x1024.
While i belive that the restrictions to square textures is no longer needed in terms of performance and RAM usage,
it simply looks strange to have such a long texture.

While you're at it, you could also try to optimize your UV Space a little more (e.g. put a few smaller things into the hole of the frame) and fit the missing pieces onto the UV space as well.
Goldeneye Source v4.2.3
get it now and play for FREE!!!
http://www.goldeneyesource.net
kraid
Been Here A While
Been Here A While
 
Joined: Thu Jan 22, 2009 12:09 pm

Re: Model pimpage Thread

Postby plagueofburia on Sat Jun 07, 2014 10:24 pm

Cool and thanks, I am trying to be as quick as possible, this bridge is developing very slow, sometimes seems like in a time warp/groundhog day.

It looks like a mess, though this seems like a better unwrap then all previous attempts. having redone the same mesh 3 times, this has diminished my enthusiasm a lot.

The texture sheet now is 1024x1024
Image

I still need another texture sheet(broken sheet)for the other parts. Also these highlighted parts I am thinking to move to the broken sheet. Or shrink the meshes along the Y axis and fit everything on this sheet but that might make things look bad.
Image

I am going to try and work a little on the texture next.
plagueofburia
Regular
Regular
 
Joined: Mon Sep 12, 2011 9:09 am

Re: Model pimpage Thread

Postby kraid on Sun Jun 08, 2014 3:13 am

You still could make all the small parts fit into the gaps of the frame.
This might give you even enough space for the broken part.

If you shrink something, you need to pay attention to texel density.
Let's say you created a cube and one side has a length of 700 pixels on the texture,
but the rest only has 300px, then it will look noticably different.
Ideally you'd keep all of the islands the same size or scale them along the edges that meet each other equally.

Parts that are not connected to each other can be scaled individually (like the X beams) just don't make the size to different from each other, because a part that is high res next to a part that is very low res will look strange, too.
But a few texels scale difference won't be noticable.
Goldeneye Source v4.2.3
get it now and play for FREE!!!
http://www.goldeneyesource.net
kraid
Been Here A While
Been Here A While
 
Joined: Thu Jan 22, 2009 12:09 pm

Re: Model pimpage Thread

Postby DoxC on Sun Jun 08, 2014 9:26 am

Hey guys, I need help scaling this,
Image
Are the windows to small/big?? because everything so far has just been scaled with my eye, and when i tried the units in metres it didnt scale in source too well (It was HUGE ). I even imported an hl2 npc and tried to go off that but i still cant get the windows the right size.
:(
DoxC
Member
Member
 
Joined: Fri Jan 10, 2014 5:44 am

Re: Model pimpage Thread

Postby [KIRBY] on Sun Jun 08, 2014 9:51 am

Source units are exactly the same as 3DS Max default units.
also Source units are Inches, if you want to keep realistic scale.

anyway, if you are unsure about sizes of windows and such things in 3ds max, make a room/window/door/whatever in Hammer out of BSP brushes, and then select option to export map as .DXF file
you will be able to import it into 3ds max and work on it.
User avatar
[KIRBY]
Regular
Regular
 
Joined: Tue Dec 17, 2013 1:59 pm
Location: Manchester

Re: Model pimpage Thread

Postby Dr. Delta on Sun Jun 08, 2014 2:08 pm

Use 'generic units', then the 3ds Max and Hammer units are equal.

In 3ds Max go to Customize > Units Setup > 'Generic Units' and under "System Unit Setup" make sure 1 Unit = 1.0 Inches.
User avatar
Dr. Delta
Veteran
Veteran
 
Joined: Thu Dec 27, 2007 1:18 pm
Location: People's Republic of Porygon

Re: Model pimpage Thread

Postby plagueofburia on Mon Jun 09, 2014 12:13 am

I am trying to do the broken parts and this seems to be the best way. If I try and make the UVs straight they will warp the texture grid. This does mean I need more UV space. Is this going in the right direction. I can try and merged them all onto one texture sheet later is this a good direction for this part of the model.

I have seen models unwrapped in this way, the HL2 ep2 red bridge is unwrapped in this way.

Image

This is just one of the 4 broken parts. I can only see this going in two ways using one 2048x2048 or two 1024x1024 sheets

At 1024x1024 to fit all the pieces onto this sheet will mean the texture will probably look blurry.

Image
plagueofburia
Regular
Regular
 
Joined: Mon Sep 12, 2011 9:09 am
PreviousNext

Return to Art Creation

Who is online

Users browsing this forum: No registered users

cron