Texture Creation
description
A nice easy look at using a GUI tool to create textures.
keywords
use, using, nemesis, plugin, plug, vtf, texture, textures.
When source came out I wrote a tutorial explaining how to create materials, but things changed and that method is now obsolete.
This tutorial will explain a easier and faster way of doing this.
Note: This method only works with Photoshop
1. Things you need:
- Nemesis VTF Plugin (clicky)
- Photoshop 6.0 and up
- Notepad
2. Setting up the plugin:
Once you downloaded the zip file, you need to extract it to a temporary folder. You will now find a dll file and a 8bi file, as well as a readme explaining how to install. In case you'r to lazy to read it you should first close photoshop, then put the dll file in the Photoshop root folder(ex: C:\Programs\Adobe\Photoshop 7.0), and the 8bi in the Plug-Ins\File Formats folder (ex: C:\Programs\Adobe\Photoshop 7.0\Plug-Ins\File Formats).
3. Working with the plugin:
Now the first thing you need to do is obviouslly open photoshop and your texture file.
Once you have it open it's as simple as doing File>Save As..>VTF
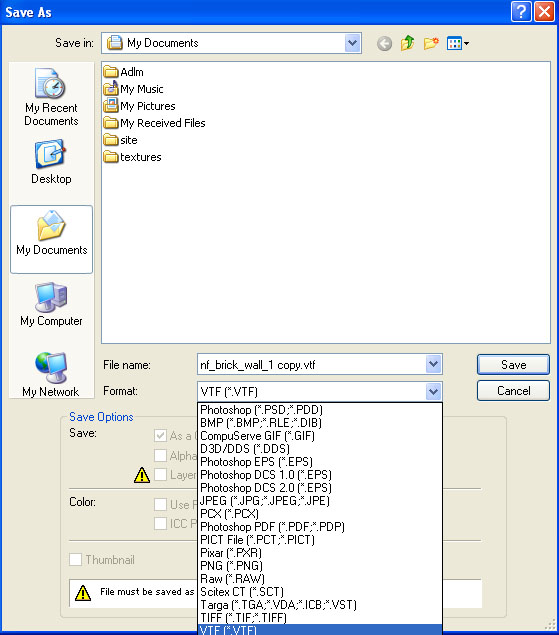
Save As.. window showing the VTF extension
If the extensions doesn't show up in the list then you didn't installed the plugin properlly. Also please be careful that photoshop automatically renames the file to copy, so delete that part before saving.
Now while using this plugin you don't need to have Steam open, neither to save it in any SDK folder(for now), so feel free to save the file everywhere you want.
After you press save, a box with several options will show up:
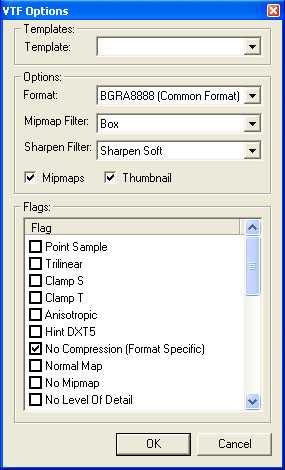
VTF Plugin Options window
The first thing you should do is to open the Template drop down menu and select the one that fits the kind of material you want to do. For a regular texture you should use Generic(default). Now it's also a good idea to change the Sharpen filter field to none, since this would change the way our texture looks, and I at least prefer them to look the way i made them.
Now the other settings you can leave in default, you should only change them if you know what you'r doing, and what they do.
Press OK and you now have the VTF of your texture.
5. Make the texture usable in hammer/game:
To make you'r texture work you need to go to the materials folder of the mod/game you'r working on(ex: C:\valve\steam\steamapps\steamlogin\counter-strike source\cstrike\materials) and create a new folder in there(ex: C:\valve\steam\steamapps\steamlogin\counter-strike source\cstrike\materials\my_textures). Now copy the VTF file you jsut created to this new folder.
The way the source material system works is using two files to define a materials. The first is the VTF(wich you just created) wich is the image itself, and the second is the VMT wich has all the information that make the texture a material, like shaders, surface properties, animations, reflections, etc..
Now to create the VMT read the next step
6. Creating the VMT:
To create the VMT you only need notepad. So open it up(Start>Run>notepad) and write the following:
- Code: Select all
"LightmappedGeneric"
{

}
What this does is to define wich shader we are using, there are several shaders, but this is the standard one wich you should use most of the times.
Next thing to do is to indicate where our material is. To do that we add the following:
- Code: Select all
"LightmappedGeneric"
{
    "$basetexture" "folder/name"
}
You just need to replace "Folder" with the name of the new folder you created inside the materials folder, and "Name" with the name of your material(without any extension), so basically this would be the relative path to our material.
Last thing to do, to create a standard material, is to define the properties of our surface, to do this we write the following:
- Code: Select all
"LightmappedGeneric"
{
    "$basetexture" "folder/name"
    "$surfaceprop" "metal"
}
You can replace metal with the type of surface that fits your material better, here is a list(this is a old list some may not work anymore, or there might be some new ones) of some of the surface properties avaiable:
CONCRETE/ROCK TYPES:
baserock
boulder
brick
concrete
concrete_block
gravel
rock
LIQUID TYPES:
slime
water
wade
METAL TYPES:
chain
chainlink
metal
metalbox
metalgrate
metalpanel
metalvent
slipperymetal
solidmetal
MISC TYPES:
computer
default
glass
ladder
ORGANIC TYPES:
alienflesh
bloodyflesh
flesh
watermelon
SNOW TYPES:
ice
snow
TERRAIN TYPES:
antlionsand
quicksand
dirt
mud
slipperyslime
grass
tile
gravel
WOOD TYPES:
wood
woodbox
woodcrate
wood_furniture
wood_lowdensity
wood_plank
wood_panel
wood_solid
Now once you have your VMT ready, go to File>Save As.. change the "Save as type" to All Fyles, and in the name write the exact name you used for the VTF but add the .vmt extension to the end(ex: If my VTF was name my_texture, I would write my_texture.vmt in the name), and save it in the new folder you created inside the materials folder, that has the vtf in it.
And that is it, if you followed every step correctlly he material should show up in hammer texture explorer, and later ingame also.
Reference Sites:
- Valve Wiki
- Nemesis @ Wavelenght
- Adobe
-BK-